

Setting the drawing scale
The drawing scale is the single most important setting in PixelTakeoff. It is what converts what you draw on screen into real world quantities.
If the scale is wrong, nothing else can save you. Every area, every length and every volume on that drawing will be wrong by the same factor, and the numbers will look completely reasonable while being useless. A scale that is out by 10 percent gives lengths that are out by 10 percent and areas that are out by 21 percent.
The good news is that it takes about a minute to set, and less than that to check.
PixelTakeoff will not let you measure without it
Section titled “PixelTakeoff will not let you measure without it”If you pick a region tool before setting a scale, you will see:
Please set the drawing scale before creating regions
This is deliberate. A measurement taken without a scale has no meaning, so rather than record a number that is silently wrong, the app asks you to set the scale first.
Finding the scale control
Section titled “Finding the scale control”The Scale control sits in the top bar, above the drawing. Until you set one it reads Not Set, so you can always see at a glance whether a drawing is ready to measure.
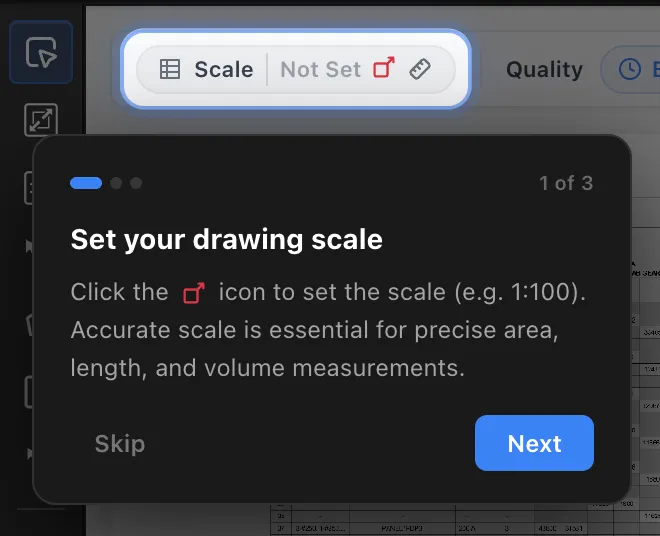
Click the scale icon  to open the Drawing scale dialog.
Method 1: choose a scale you already know
Section titled “Method 1: choose a scale you already know”Use this when the sheet states its scale in the title block and you are confident the PDF has not been resized.
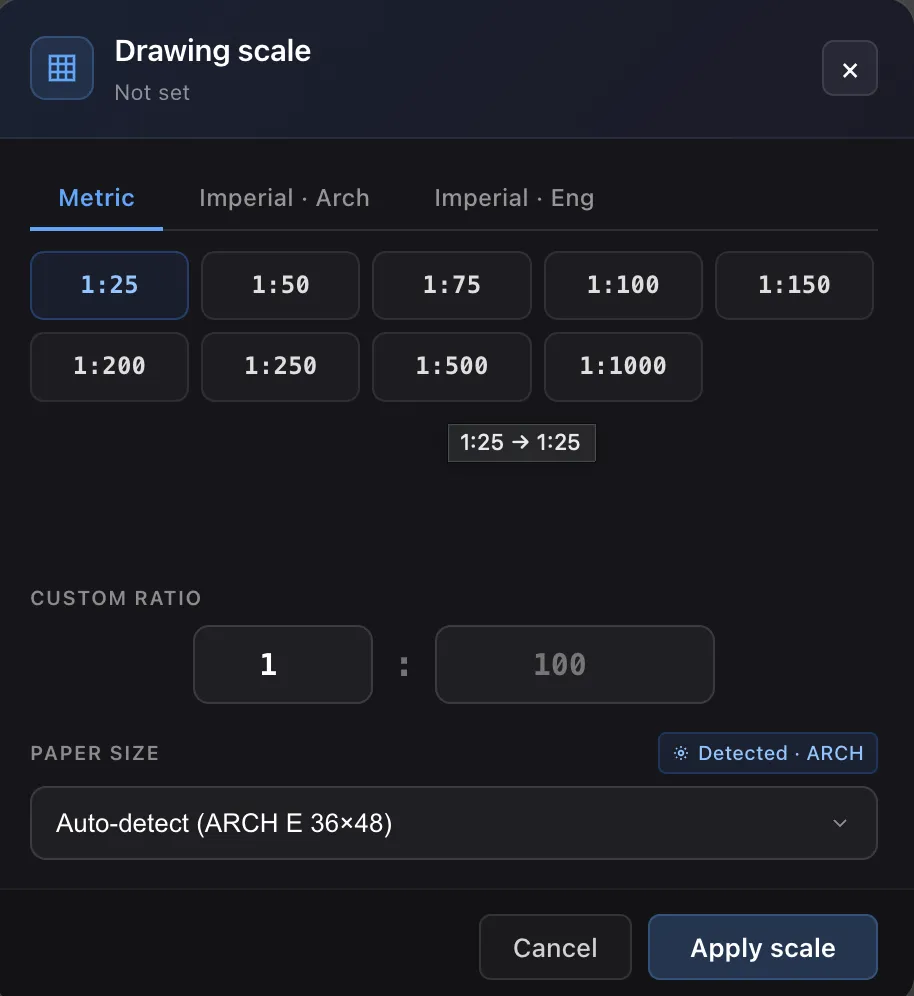
- Pick the unit system: Metric, Imperial · Arch or Imperial · Eng.
- Click the preset that matches your drawing. Metric offers 1:25, 1:50, 1:75, 1:100, 1:150, 1:200, 1:250, 1:500 and 1:1000.
- Click Apply scale.
If your scale is not one of the presets
Section titled “If your scale is not one of the presets”Use Custom Ratio underneath. The first number is fixed at 1, so you enter
only the second one: 100 gives 1:100.
Paper size
Section titled “Paper size”Paper Size is detected from the drawing and shown as Auto-detect, with a badge naming what was found, for example Detected · ARCH.
Leave it on auto-detect unless you know the detected size is wrong. If a sheet has been trimmed, re-fitted, or exported to a different page size than it was drawn at, choosing the correct size here is what keeps the scale honest.
If the quantities matter and you have any doubt about the sheet, calibrate against a known dimension instead, which sidesteps both the scale and the paper size in one step.
Method 2: calibrate from a known dimension
Section titled “Method 2: calibrate from a known dimension”Use this when you do not know the scale, when the title block cannot be trusted, or whenever the quantities matter enough to verify. This is the more reliable method, and it is the one we recommend by default.
PDFs are frequently scaled during printing or exporting, and a sheet marked 1:100 that has been fitted to A3 is no longer 1:100. Calibrating from something real sidesteps that entirely.
Calibration has its own button,  Calibrate Scale, sitting beside the
Scale control in the top bar. It is a separate route from the Measure Width
tool, which measures without changing anything.
Calibrate Scale, sitting beside the
Scale control in the top bar. It is a separate route from the Measure Width
tool, which measures without changing anything.
First, find something on the drawing whose true length you know. A dimension line with its value printed is ideal. A scale bar works well. A known building element such as a standard door or a grid spacing also works.
Step 1: start calibration
Section titled “Step 1: start calibration”Click Calibrate Scale. A panel appears listing what to do
next.
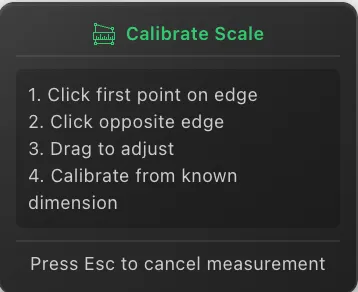
Step 2: measure the known dimension
Section titled “Step 2: measure the known dimension”Click the first point, then the opposite end. A measurement line is drawn with a live readout in both metric and imperial.

Zoom in before clicking. Precision here carries into every quantity on the drawing.
Step 3: confirm the measurement
Section titled “Step 3: confirm the measurement”The panel now shows what you measured. Check it against the dimension you are calibrating from, then click Calibrate.
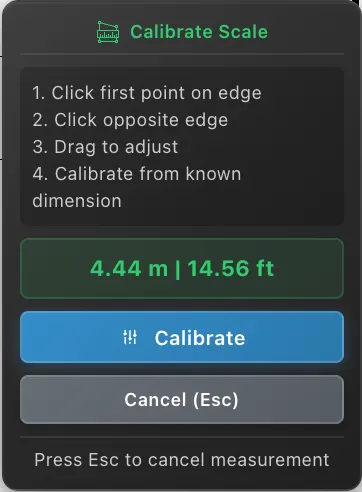
If a click landed off, press Esc and measure again. It takes a couple of
seconds and is worth doing rather than accepting a measurement you are not happy
with, since this one number sets every quantity on the drawing.
Step 4: enter the real length
Section titled “Step 4: enter the real length”The Scale Calibration dialog opens, showing what you measured at the current scale.
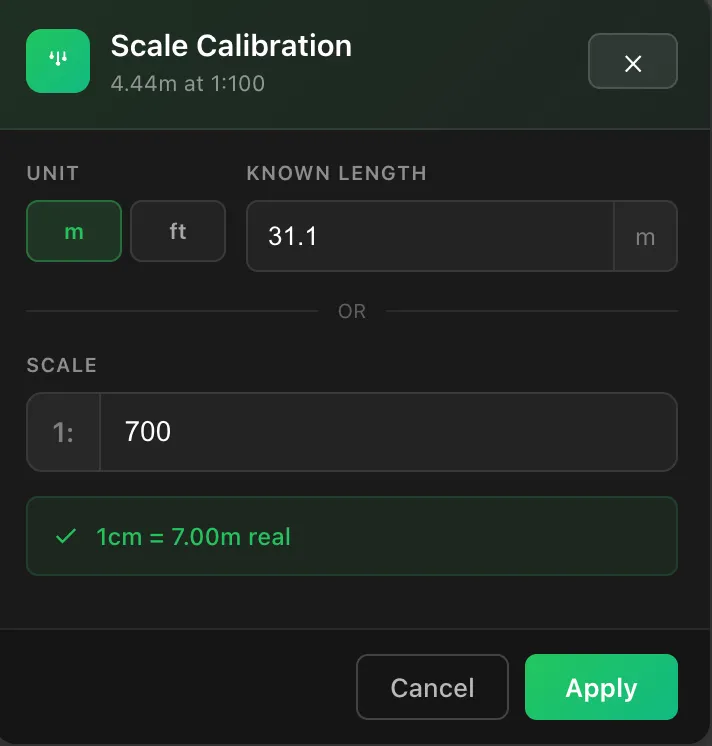
Choose the Unit, then type the Known Length, meaning the real world
length of what you just measured. A confirmation line shows the scale this
produces, for example 1cm = 7.00m real. Check it looks sensible, then click
Apply.
Alternatively, use the Scale field to enter a ratio directly instead of a length, if you would rather state the scale than the dimension.
Why the result is a round number
Section titled “Why the result is a round number”The calculated scale is rounded to the nearest whole value. Your clicks will always land slightly off the exact endpoints, which would otherwise produce a scale like 1:99.6. Rounding settles on the drawing’s intended scale and removes that click error rather than baking it in.
If the rounded result is far from what you expected, for example you were expecting 1:100 and get 1:250, do not accept it. Something is wrong with either the dimension you chose or the points you clicked. Try a different, longer dimension.
Always verify
Section titled “Always verify”Setting the scale takes a minute. Checking it takes fifteen seconds and is worth doing every single time.
After setting the scale, measure a different known dimension with Measure Width and confirm it reads the value you expect. Use a long one if you can, because a long dimension exposes a small percentage error that a short one hides.
A good habit: calibrate on one dimension, verify on another at the opposite end of the sheet.
Changing the scale later
Section titled “Changing the scale later”If you set the scale wrongly and have already done work, you do not need to start again. When you change the scale, PixelTakeoff recalculates every existing quantity on that drawing to match the new one. Areas, perimeters, volumes and linear lengths are all updated together.
Do spot check a couple of values afterwards to confirm they moved the way you expected.
Scale and drawing quality
Section titled “Scale and drawing quality”Drawing quality and drawing scale are separate settings and do not affect each other’s results. Quality changes how much detail you can see and click accurately, while scale converts what you measure into real units. Raising quality will not fix a wrong scale, and changing quality will not corrupt quantities you have already taken off.
Troubleshooting
Section titled “Troubleshooting”Every quantity looks roughly double or half what it should be. The scale is out by that factor. Recalibrate against a known dimension.
Areas are wrong but lengths look right, or the reverse. This is not a scale problem, since scale affects both together and affects area by the square of the factor it affects length. Check the units you are displaying in Settings.
My scale is not in the preset list. Use Custom Ratio. The first number is
fixed at 1, so enter only the second one: 100 for 1:100.
My drawing is in imperial. Switch to the Imperial · Arch or Imperial · Eng tab at the top of the dialog before choosing a scale.
The paper size looks wrong. Change it from Auto-detect to the correct size. If you are unsure what the sheet really is, calibrate from a known dimension instead, since that gets the right answer regardless of paper size.
I calibrated but the numbers are still wrong. Confirm the dimension you calibrated against was a true dimension rather than a leader line or an annotation that happened to look like one, and that you clicked its actual endpoints rather than the ends of its arrowheads.