

Groups, work in progress and saved layers
Everything you measure belongs to a group. Groups are how PixelTakeoff totals your work, and they are what you price from, so getting them right is worth a little care up front.
What defines a group
Section titled “What defines a group”A group is defined by its name and its colour together.
Everything taken off as “Paving” in the same colour goes into one total. Change either the name or the colour and you are working in a different group.
This has two practical consequences:
- Take off the same material under two names and you get two totals, and it is easy to price one and forget the other.
- Use one name with two colours and you get two groups, which is sometimes exactly what you want, for example “Paving” in one colour for new and another for existing.
Name groups the way your bill of quantities reads. A colleague opening your exported sheet should recognise the names without asking.
Work in progress
Section titled “Work in progress”New takeoff lands in the work in progress area first. It is a staging area: yours to adjust freely before committing.
Each group shows its colour, name, item count and running total. Expand it to see the individual items.
The heading counts what is in progress, and groups sit under a heading per kind. Area groups come first, then Linear Regions, then Count Markers, each with its own total in its own unit:
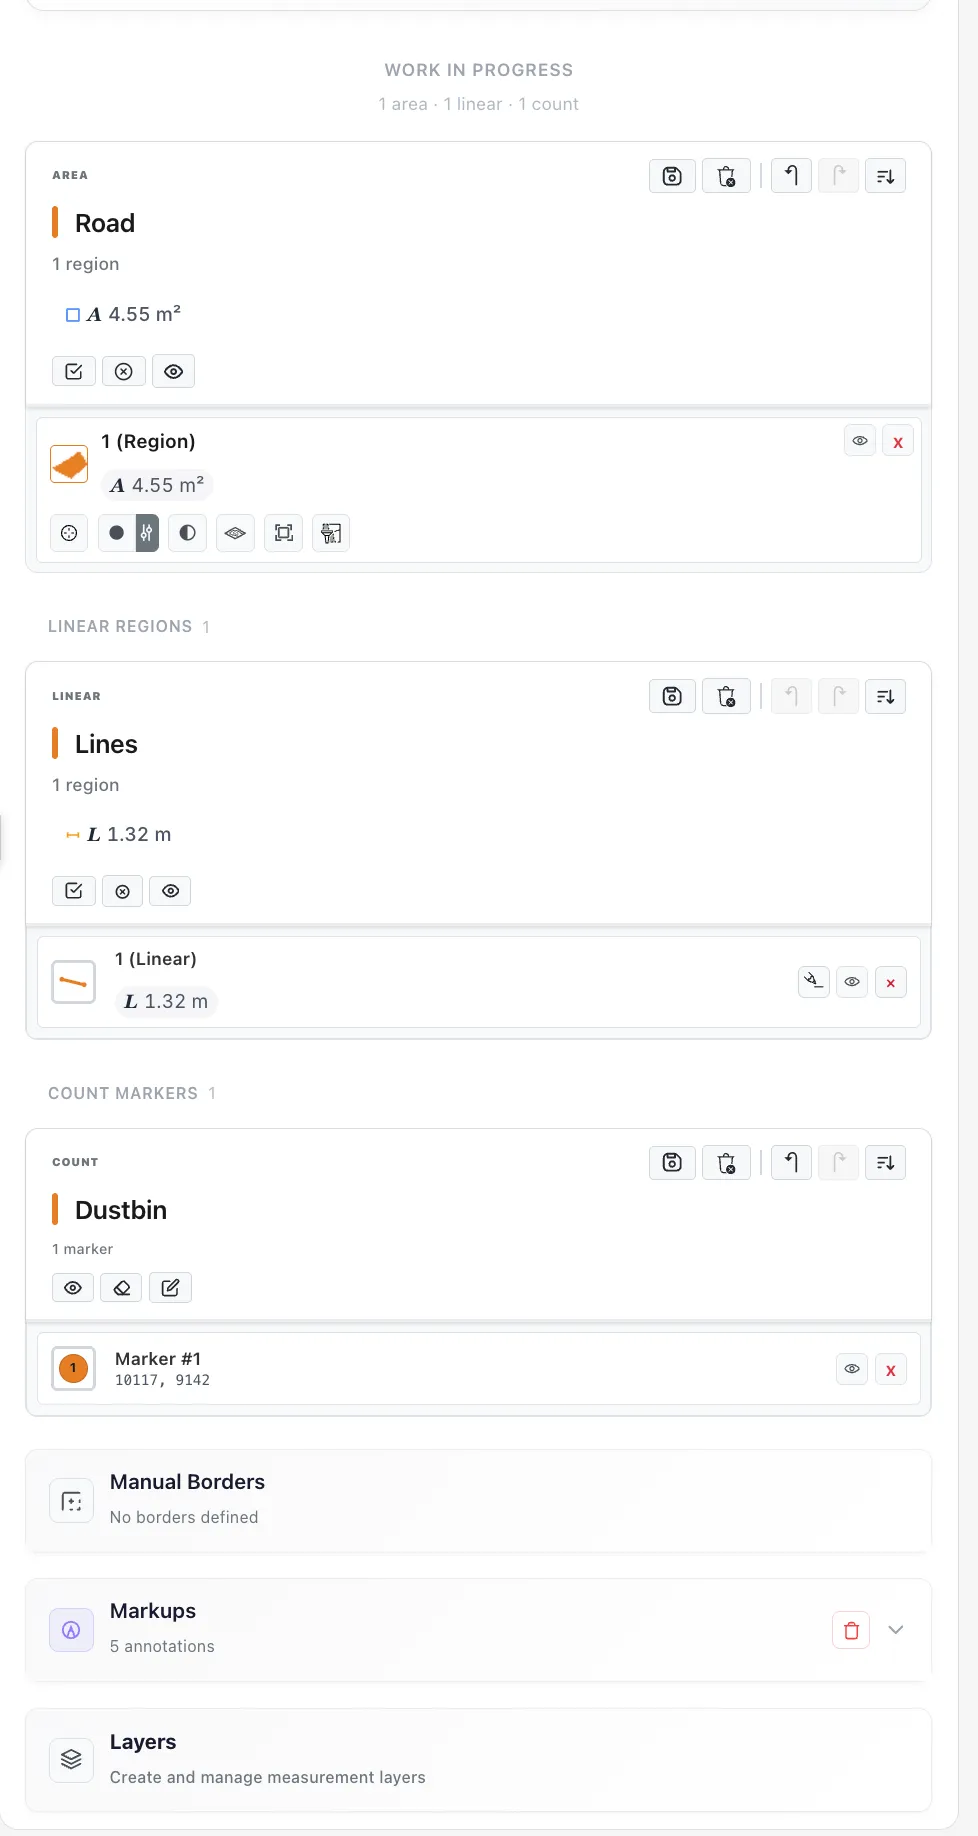
Below the groups sit the Manual Borders, Markups and Layers sections. Borders and markups are listed there but never counted, so a drawing can show five annotations and still total nothing extra.
Actions on the whole group
Section titled “Actions on the whole group”The buttons on the group header act on everything in the group:
 Save Group commits the group into saved layers.
 Delete Group removes the group and its items.
- ↶ Undo and ↷ Redo step through operations on that group alone. This is more useful than it first appears: you can undo a bad erase on your paving without disturbing the planting you took off afterwards. The buttons grey out when there is nothing to step through.
 Sort regions changes the order items are listed in.
 Hide All takes the whole group out of view, and Unhide All
brings it back.
Hide All takes the whole group out of view, and Unhide All
brings it back. Edit Settings opens the group’s measurement settings.
Actions on one region
Section titled “Actions on one region”Each region has its own row inside the group, with a small picture of its shape and its own quantity, so you can match a row to what it is on the drawing.
 Hide takes just that region out of view and out of the totals.
- Delete removes just that region. The group total drops by exactly its quantity.
- Tick its box to include it in a selection.
Some regions can also be reshaped by dragging their points, covered below.
Acting on several regions at once
Section titled “Acting on several regions at once”Tick boxes on individual regions, or use  Select All on the group,
then act on the whole selection:
Select All on the group,
then act on the whole selection:
 Combine Selected merges the selected regions into one, keeping the total.
 Duplicate Selected copies them, which is how repeated identical items are
taken off once and reused. A duplicate left sitting on its original counts
twice, which is intended.
Duplicate Selected copies them, which is how repeated identical items are
taken off once and reused. A duplicate left sitting on its original counts
twice, which is intended.- Delete removes everything selected in one action.
Deselect All clears the selection. Selecting is also how you act on a whole material at once without touching other groups.
Editing an item’s shape
Section titled “Editing an item’s shape”Some items can be reshaped after they are drawn by dragging their points. Quantities update as soon as you release, so you can nudge a boundary and watch the number settle.
Saved layers
Section titled “Saved layers”Committed takeoff. A saved layer is protected from the eraser and the editing tools, so finished work cannot be damaged while you take off the next material. To change one, Edit Group reopens it deliberately.
Saving does not change your numbers: work in progress and saved layers both appear in the totals, the summary and the exports. The difference is protection, not inclusion.
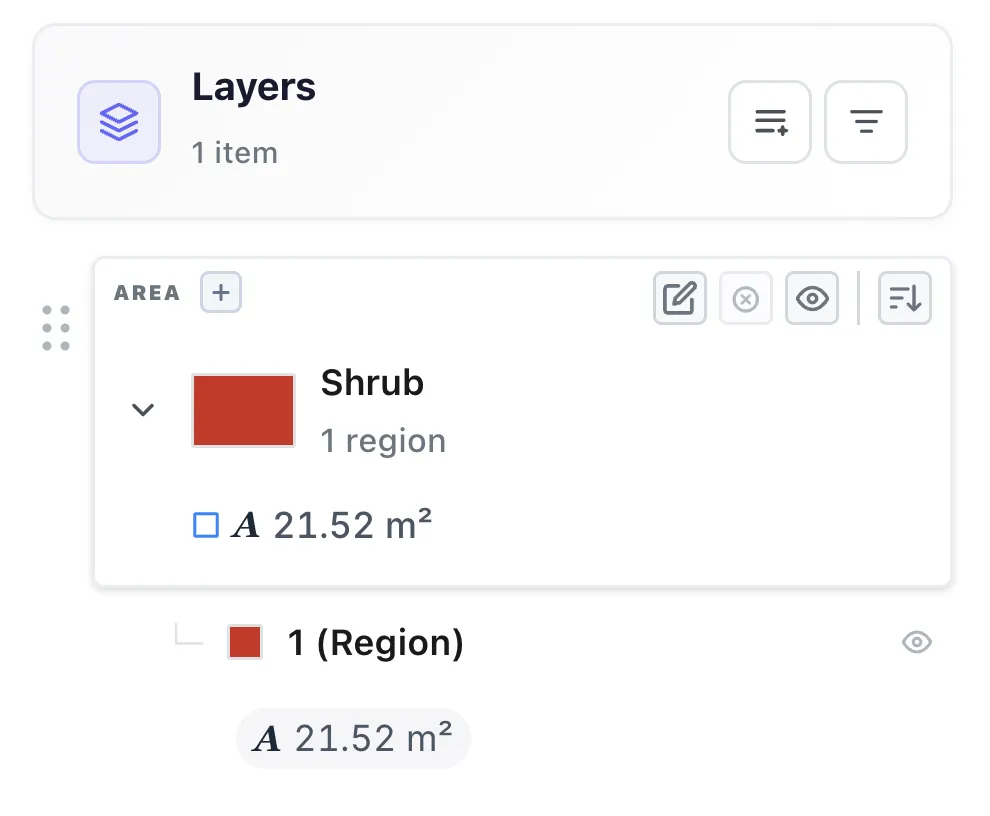
Layer actions
Section titled “Layer actions” Edit Group reopens the group to change its name, colour, or measurement
settings such as depth or width. Changing a setting that affects a derived
quantity, for example depth, updates the quantity for the whole group at once.
Drag to reorder changes the order groups are drawn in and listed in. This matters where regions overlap visually, since the order decides what is drawn on top, and it also sets the row order on your exported summary. Put groups in the order your bill reads and the exported sheet needs no rearranging.
Hide takes a group out of the view and out of the totals. This is the
fastest way to check one material in isolation, or to produce an export covering
only part of the work.
Delete removes the group. Use it deliberately, since this is committed work.
Measurement settings per group
Section titled “Measurement settings per group”Some quantities are derived rather than measured directly, and they come from settings you put on the group.
| Setting | Applies to | Gives you |
|---|---|---|
| Depth | Area groups | Volume, as area multiplied by depth |
| Width | Linear groups | A₁, as length multiplied by width |
| Second width | Linear groups | A₂, for a run that drives two quantities |
| Perimeter display | Area groups | Which of Pₙ, Pₑ and Pᵥ are shown and totalled |
Set a depth of 150 mm on a group totalling 120 m² and you get 18 m³.
Perimeter is shown as three separate figures because they price differently. The outside edge of a lawn is Pₑ. Add the edges of planting beds cut into it and you have Pₙ. Pᵥ is the bed edges alone.
At least one of the three stays ticked while Perimeter is on. The last one is locked rather than refused, so to swap which figure you show, tick the replacement first and the lock moves to it.
A workflow that keeps totals trustworthy
Section titled “A workflow that keeps totals trustworthy”- Name and colour the group before you start clicking, not after.
- Take off all of one material before moving to the next, so you are not switching groups constantly.
- Check the running total looks plausible before you save the group.
- Save it, then move on.
- Before exporting, unhide everything and confirm the group list matches the materials you intended to measure.
That last step catches the most common reporting mistake, which is a group left hidden and therefore missing from the export.
Common questions
Section titled “Common questions”I named two groups slightly differently by accident. Use Edit Group to rename one to match. Groups with the same name and colour total together.
Can I move an item from one group to another? Change the group’s name and colour to move everything in it. For a single item, the practical route is to delete it and retake it under the right group.
Why is my total lower than the sum of the parts I see? A group is hidden, or an item inside a group is hidden. Both are excluded from totals.
Does the order of groups affect quantities? No. Order affects drawing order and the row order in exports, never the numbers.