

Area takeoff
Area takeoff is the core of most jobs: paving, lawn, planting beds, gravel, concrete. PixelTakeoff gives you several tools for it because drawings vary, and picking the right one saves a lot of correcting later.
Set the drawing scale with the  Scale control in the top bar before you
start.
Scale control in the top bar before you
start.
Which tool should I use?
Section titled “Which tool should I use?”Start with Region when the area is plain, evenly coloured and cleanly bounded, which is what it is built for. Move to one of the others as soon as the drawing is busier than that, and do not spend long fighting Region on an area it was never going to resolve.
| Situation | Tool |
|---|---|
| A plain area of solid colour with a clean edge around it |  Region ( Region (R) |
| Region grabs too much or too little and tolerance will not fix it |  Precision Region ( Precision Region (P) |
| The area is hatched or textured and Region picks up only a strip of it, or it continues past one you already took off |  Expand Region ( Expand Region (X) |
| The area is made of several colours rather than one flat fill |  Inclusive Region ( Inclusive Region (I) |
| The shape is a plain box, circle, ellipse or polygon |  Shape ( Shape (S) |
| The boundary is irregular and you want to draw it yourself |  Free Trace ( Free Trace (F) |
| Every area of one colour, all at once |  Color Sweep ( Color Sweep (D) |
| Only some of the colours inside a shape should count |  Color Filter ( Color Filter (Q) |
| Many separate areas, taken off in one action |  Batch Takeoff, from the canvas controls Batch Takeoff, from the canvas controls |
| The area is not enclosed because a boundary line is broken |  Manual Border ( Manual Border (B) first, then Region |
There is also  Find Pattern (
G), for finding every place a detail or
arrangement appears before you measure it:
Before your first click: name and colour
Section titled “Before your first click: name and colour”In the right panel, set the region name and colour before you start clicking.
Name and colour together define a group, and groups are what carry the totals you will price from. Everything you take off as “Paving” in the same colour adds into one total. If you take off half your paving under one name and half under another, you get two totals and it is easy to miss one.
Pick something a colleague would recognise on a printed sheet. Naming a group “Area 1” helps nobody at pricing time.
Region
Section titled “Region” The first tool to try on a plain area of solid colour with a clean edge
around it.
- Select Region (
R). - Set the name and colour.
- Click inside the area you want.
PixelTakeoff detects the enclosed area around where you clicked, fills it, and measures it. Click the next area, and it adds to the same group.
Hatching, texture, materials drawn in similar tones and broken boundaries all push past what Region is for. Each has its own tool below, so switch rather than persist.
Color Tolerance
Section titled “Color Tolerance”Color Tolerance controls how closely colours must match for the tool to treat two parts of the drawing as the same area. It runs from 1 to 50 and defaults to 8.
- Fill escaped into areas you did not want: lower the tolerance.
- Fill stopped short of where it should have reached: raise it.
Change it in  Region Settings, then click again. Work in small steps, since
moving from 8 to 40 in one go usually replaces one problem with the other.
Region Settings, then click again. Work in small steps, since
moving from 8 to 40 in one go usually replaces one problem with the other.
A hatched or textured area often needs a higher tolerance than a flat filled one, because the hatch introduces colour variation the tool would otherwise treat as a boundary.
When the fill escapes across the whole sheet
Section titled “When the fill escapes across the whole sheet”This nearly always means the boundary has a gap in it, so the fill leaks out and keeps going. Lowering tolerance may not help, because the gap is a genuine hole rather than a colour difference.
Use Manual Border (B) to draw a temporary line across the gap, then fill
again. Borders you draw are guides for the fill and are not part of your
measured quantities.
Precision Region
Section titled “Precision Region” Use when Region cannot resolve an area cleanly, typically because the drawing
puts several materials in very similar tones, or the area you want is only part
of what Region detects.
It gives you finer control over what gets included at the cost of a little more work per area. If you find yourself fighting tolerance on the same area more than twice, switch to Precision Region rather than continuing to guess.
Expand Region
Section titled “Expand Region” Use it for an area that will not come out in one click, and to grow one you
have already taken off.
Click inside the area. The fill spreads outward, carries past the lighter linework in its way, and holds at the solid edge around it. Click the same spot again and it reaches further. A dashed ring marks the spot you are expanding from and grows with each click, so you can see how far you have pushed it.
Taking it one click at a time is the point. Stop as soon as the fill covers what you meant, rather than reaching too far and correcting afterwards.
Hatched and textured areas
Section titled “Hatched and textured areas”This is the tool for hatching. A hatch is drawn as light lines and gaps inside a darker outline, so a single Region click often measures one narrow strip between two hatch lines and nothing more. Expand Region carries the fill across the hatch and holds at the outline, so the area comes out whole.
If a click seems to do nothing, you probably landed on one of the hatch lines rather than in a gap. Click the same spot again: it still steps up, and the next click usually catches.
Extending an area you already measured
Section titled “Extending an area you already measured”Use it when an area continues past a boundary you filled first, for example paving running on into the next bay.
It adds to the existing region rather than creating a second one, so the group total stays correct without you merging anything afterwards.
If it reaches too far
Section titled “If it reaches too far”Step back with Undo, then turn  CrossGuard on and try again. CrossGuard
is the control for a fill that escapes past an edge you can plainly see.
CrossGuard on and try again. CrossGuard
is the control for a fill that escapes past an edge you can plainly see.
Inclusive Region
Section titled “Inclusive Region” Inclusive Region (I) is for an area that is not one flat colour. Rather
than clicking and hoping, you tell it which colours belong to the area first,
then take the whole thing off in one click.
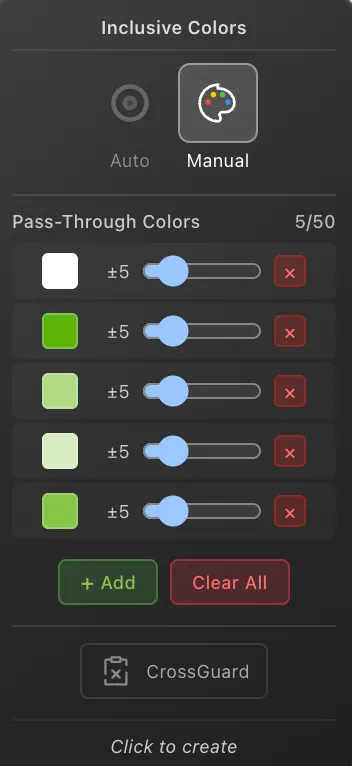
Its panel is headed Inclusive Colors, and you can build the list two ways:
| Mode | How you add colours | |
|---|---|---|
 | Auto | Click on the drawing and it collects the colours around that point. The Radius slider sets how wide it looks |
 | Manual | Add each colour yourself |
What you collect is listed underneath as Pass-Through Colors, up to 50 of them. Everything on that list counts as part of the area, so the fill crosses it freely. Anything not on the list acts as a barrier and stops the fill.
Each row has its own ± tolerance, from 1 to 25, so one colour can be matched tightly while another is allowed to vary. Raise a row if part of the material is being left out. Lower it if the fill is picking up something beside it.
+ Add puts another colour in the list, the ✕ on a row removes it, and Clear All empties the list. Clear it between materials rather than adding to what is already there, or the next takeoff will include the last one.
Then click inside the area and it takes off everything made of those colours in one action.
Turn CrossGuard on if a fill still escapes.
CrossGuard
Section titled “CrossGuard”Boundary lines on real drawings are rarely perfect. Dashed linework, hairline breaks, and places where a dimension or utility line crosses a boundary can let an area fill escape past the edge you intended.
CrossGuard keeps the fill inside the boundary you can see. Turn it on
from the settings of Expand Region or
Inclusive Region, or press ⇧X while either tool is active.
The Max gap slider sets how much imperfection it allows for. Start at 8 and raise it only if a fill still escapes. Higher is not better, so prefer the smallest value that keeps the fill where you want it.
Normal view and Hueprint each remember their own value, since a sheet often needs a different setting in one view than in the other.
For areas that are simply geometric. Shape (S) draws the area
directly, without relying on the drawing having a detectable boundary at all.
Its sub-toolbar offers seven ways to draw:
| Mode | Key | Draws | |
|---|---|---|---|
 | Polygon | 1 | An outline, clicked corner by corner |
 | Drag Box | 2 | A rectangle you size by dragging |
 | Box | 3 | A fixed square, placed with one click |
 | Drag Circle | 4 | A circle you size by dragging |
 | Circle | 5 | A fixed circle, placed with one click |
 | Brush | 6 | A freehand painted area |
 | Ellipse | 7 | An ellipse |
Circle and Box share one size, set with the slider in their side panel, so you can stamp repeated areas of a known size click after click.
This is the right tool for an area that is described in a note rather than drawn, or for a quick allowance.
Free Trace
Section titled “Free Trace” Draw the boundary yourself, freehand. Use it when the area is irregular, the
drawing is a poor scan, or no automatic tool is getting close.
It is slower, so treat it as a fallback rather than a default.
Color Sweep
Section titled “Color Sweep”When a drawing uses a consistent fill colour per material, Color Sweep (D)
picks up everything sharing that colour in one action instead of you clicking
each area.
Check the result before moving on. If the drawing reuses one colour for two different materials, the sweep will collect both, and you will need to erase what you did not want.
Color Filter
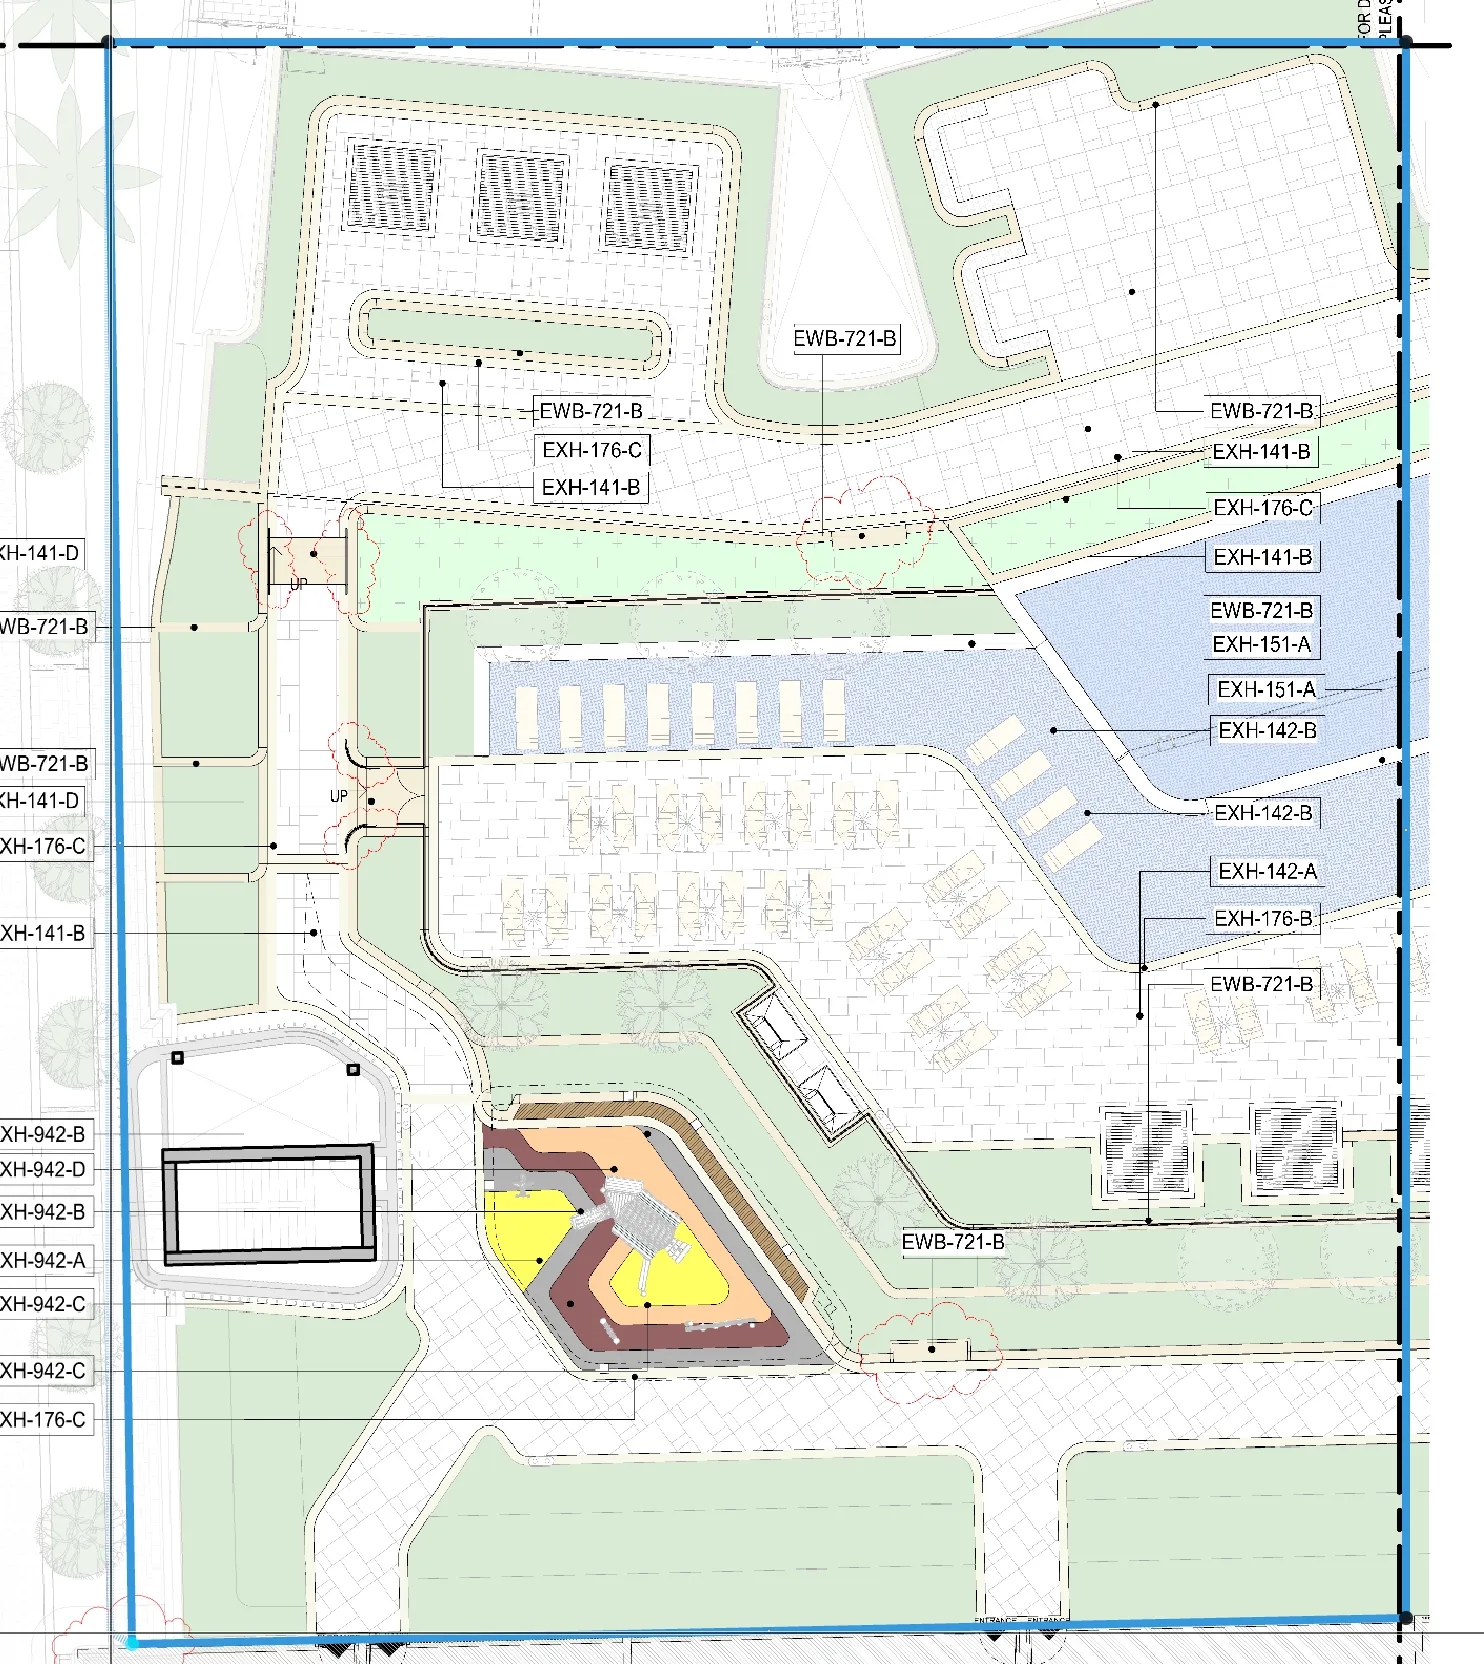
Section titled “Color Filter” Color Filter (Q) measures only the colours you choose inside a shape you
draw. Use it when the material you need shares its space with linework, text or
other materials, so a boundary alone cannot separate them.
- Press
Qand click around the area, placing points the same way as a Shape polygon. The points work the same too: drag one to move it, click a line to add one, click a grey point to backtrack, andCmd/Ctrl+Zsteps back. - Press
Enteror click the last point to finish. The Color Filter window opens on everything inside your polygon, listing every colour it found with its share of the area.
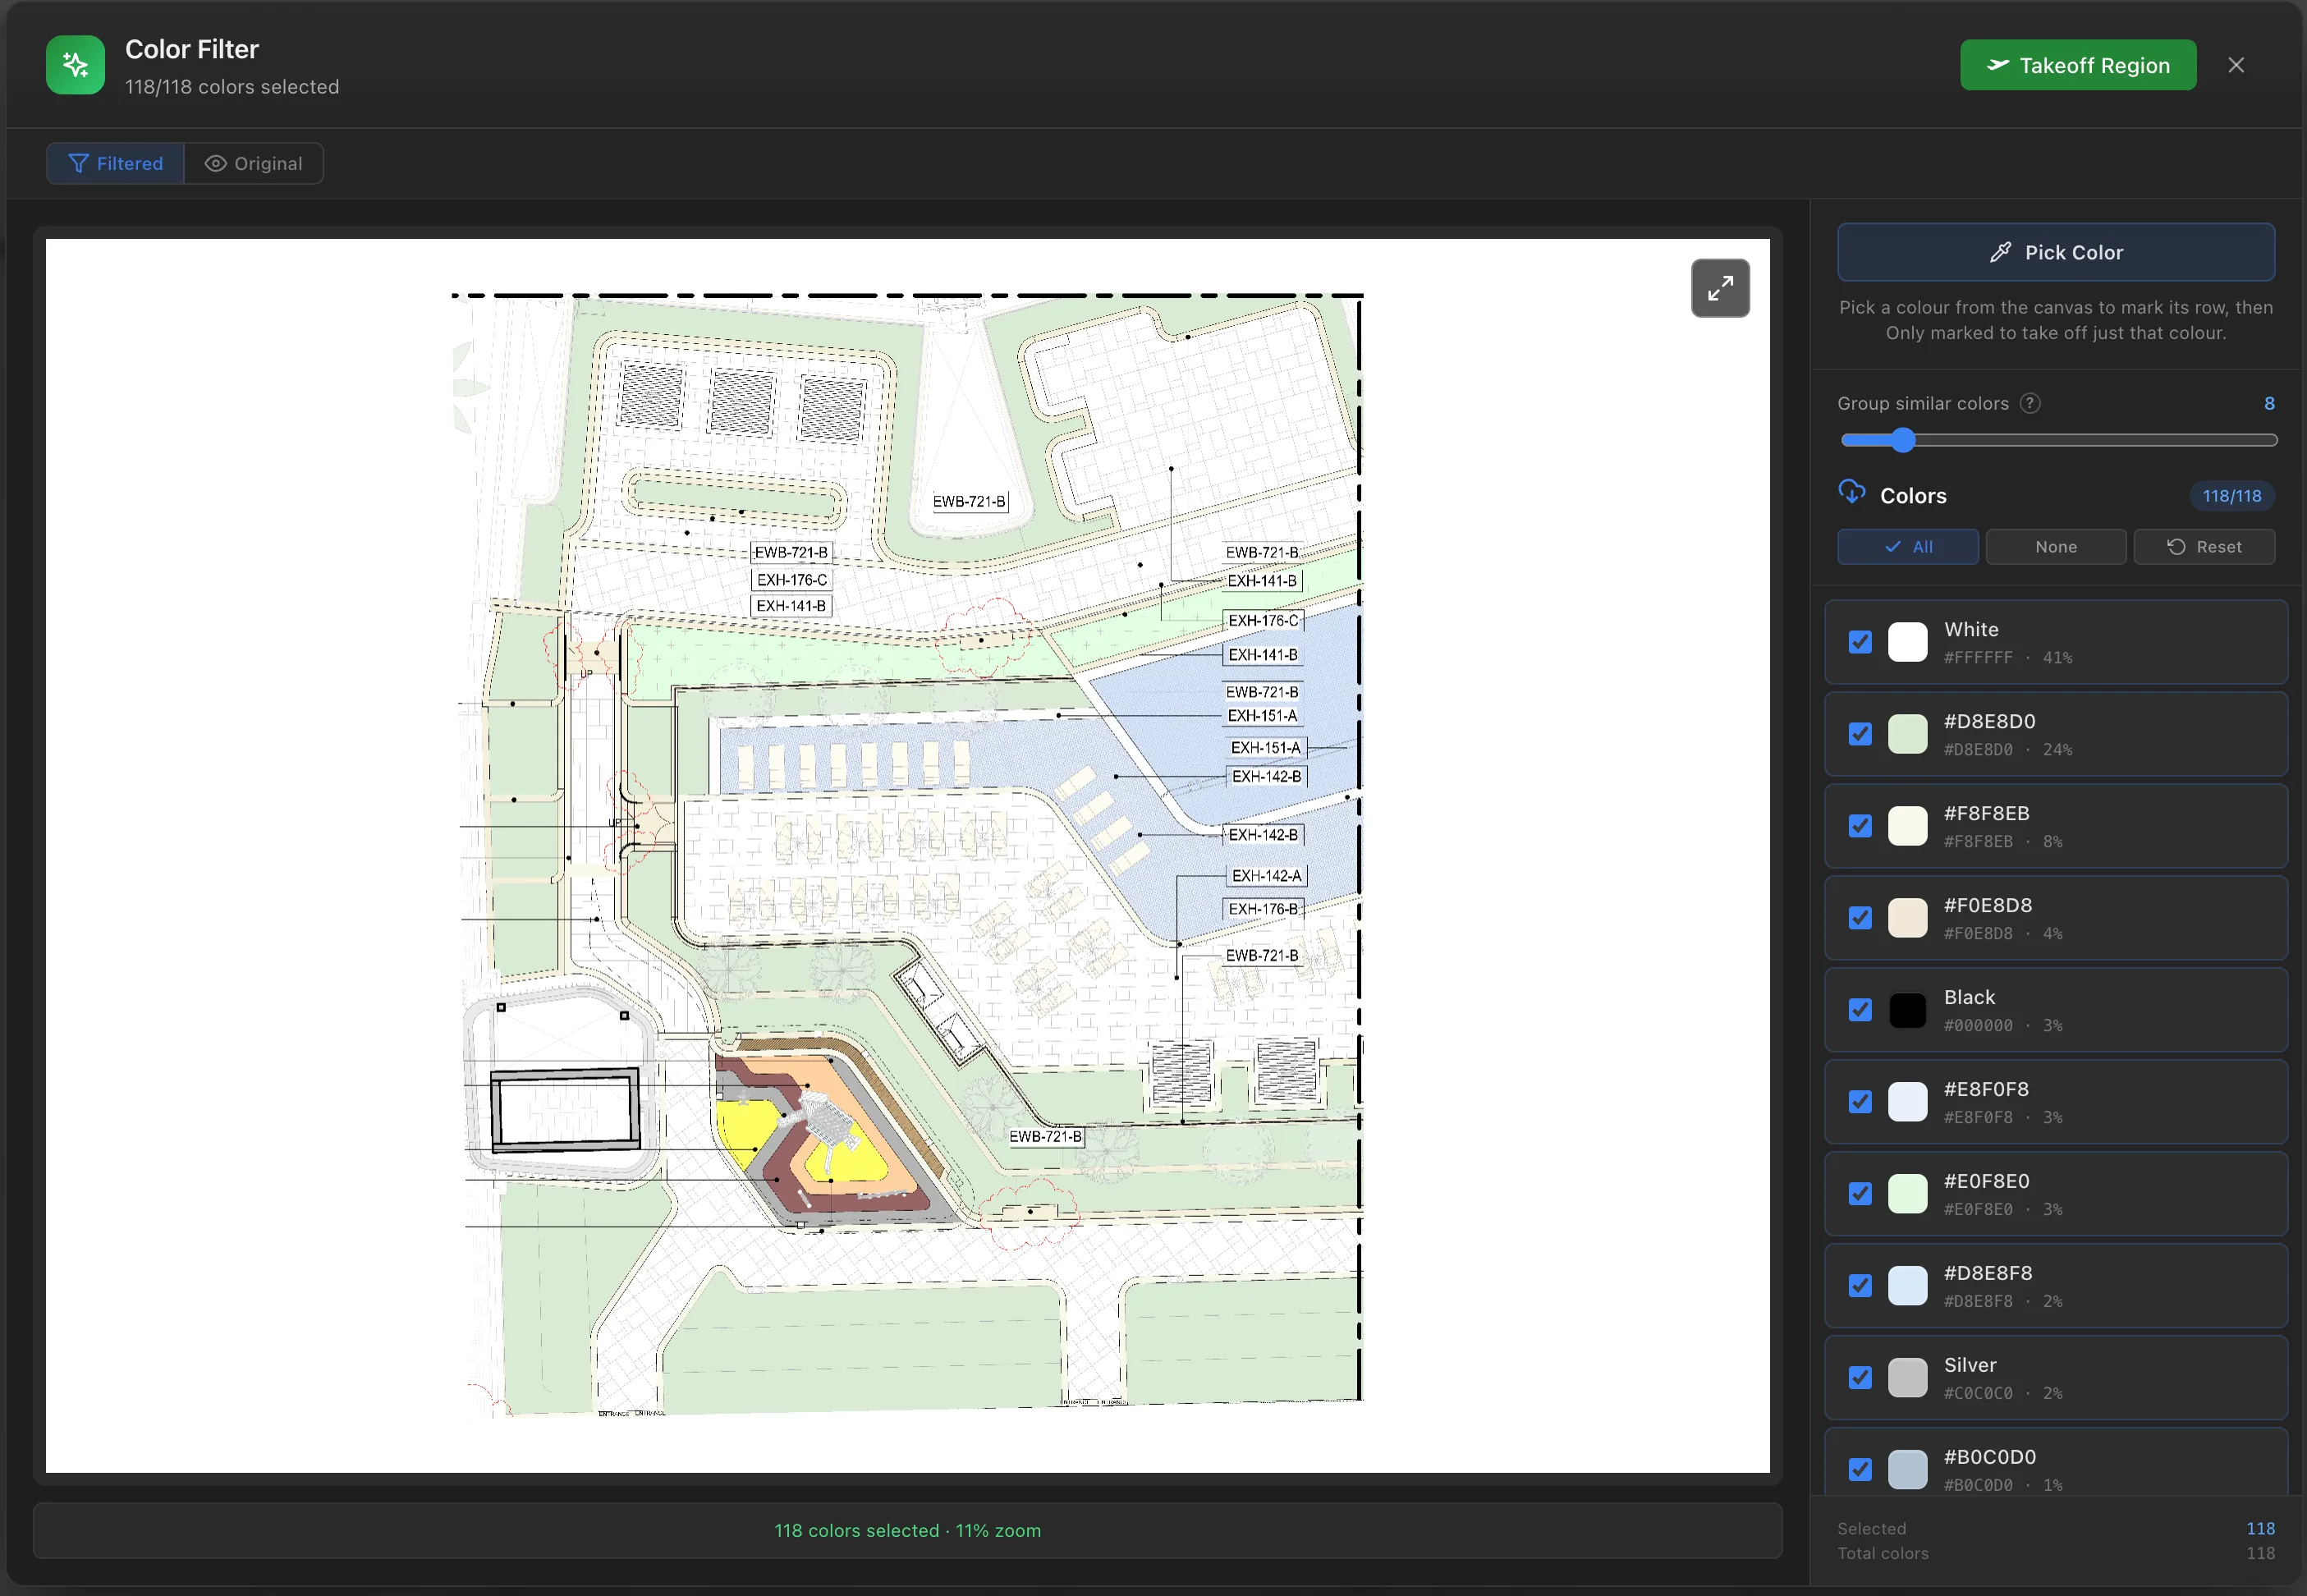
- Keep the colours you want. Untick rows to drop colours, or click Pick Color and click the colours directly on the preview, then Keep only to drop everything else. The preview updates as you go, and Original shows the unfiltered drawing for comparison.
- If the list splits one material into many rows, or merges two materials into one, drag Group similar colors. Lower separates close shades, higher merges them, and your ticks and picks carry over.
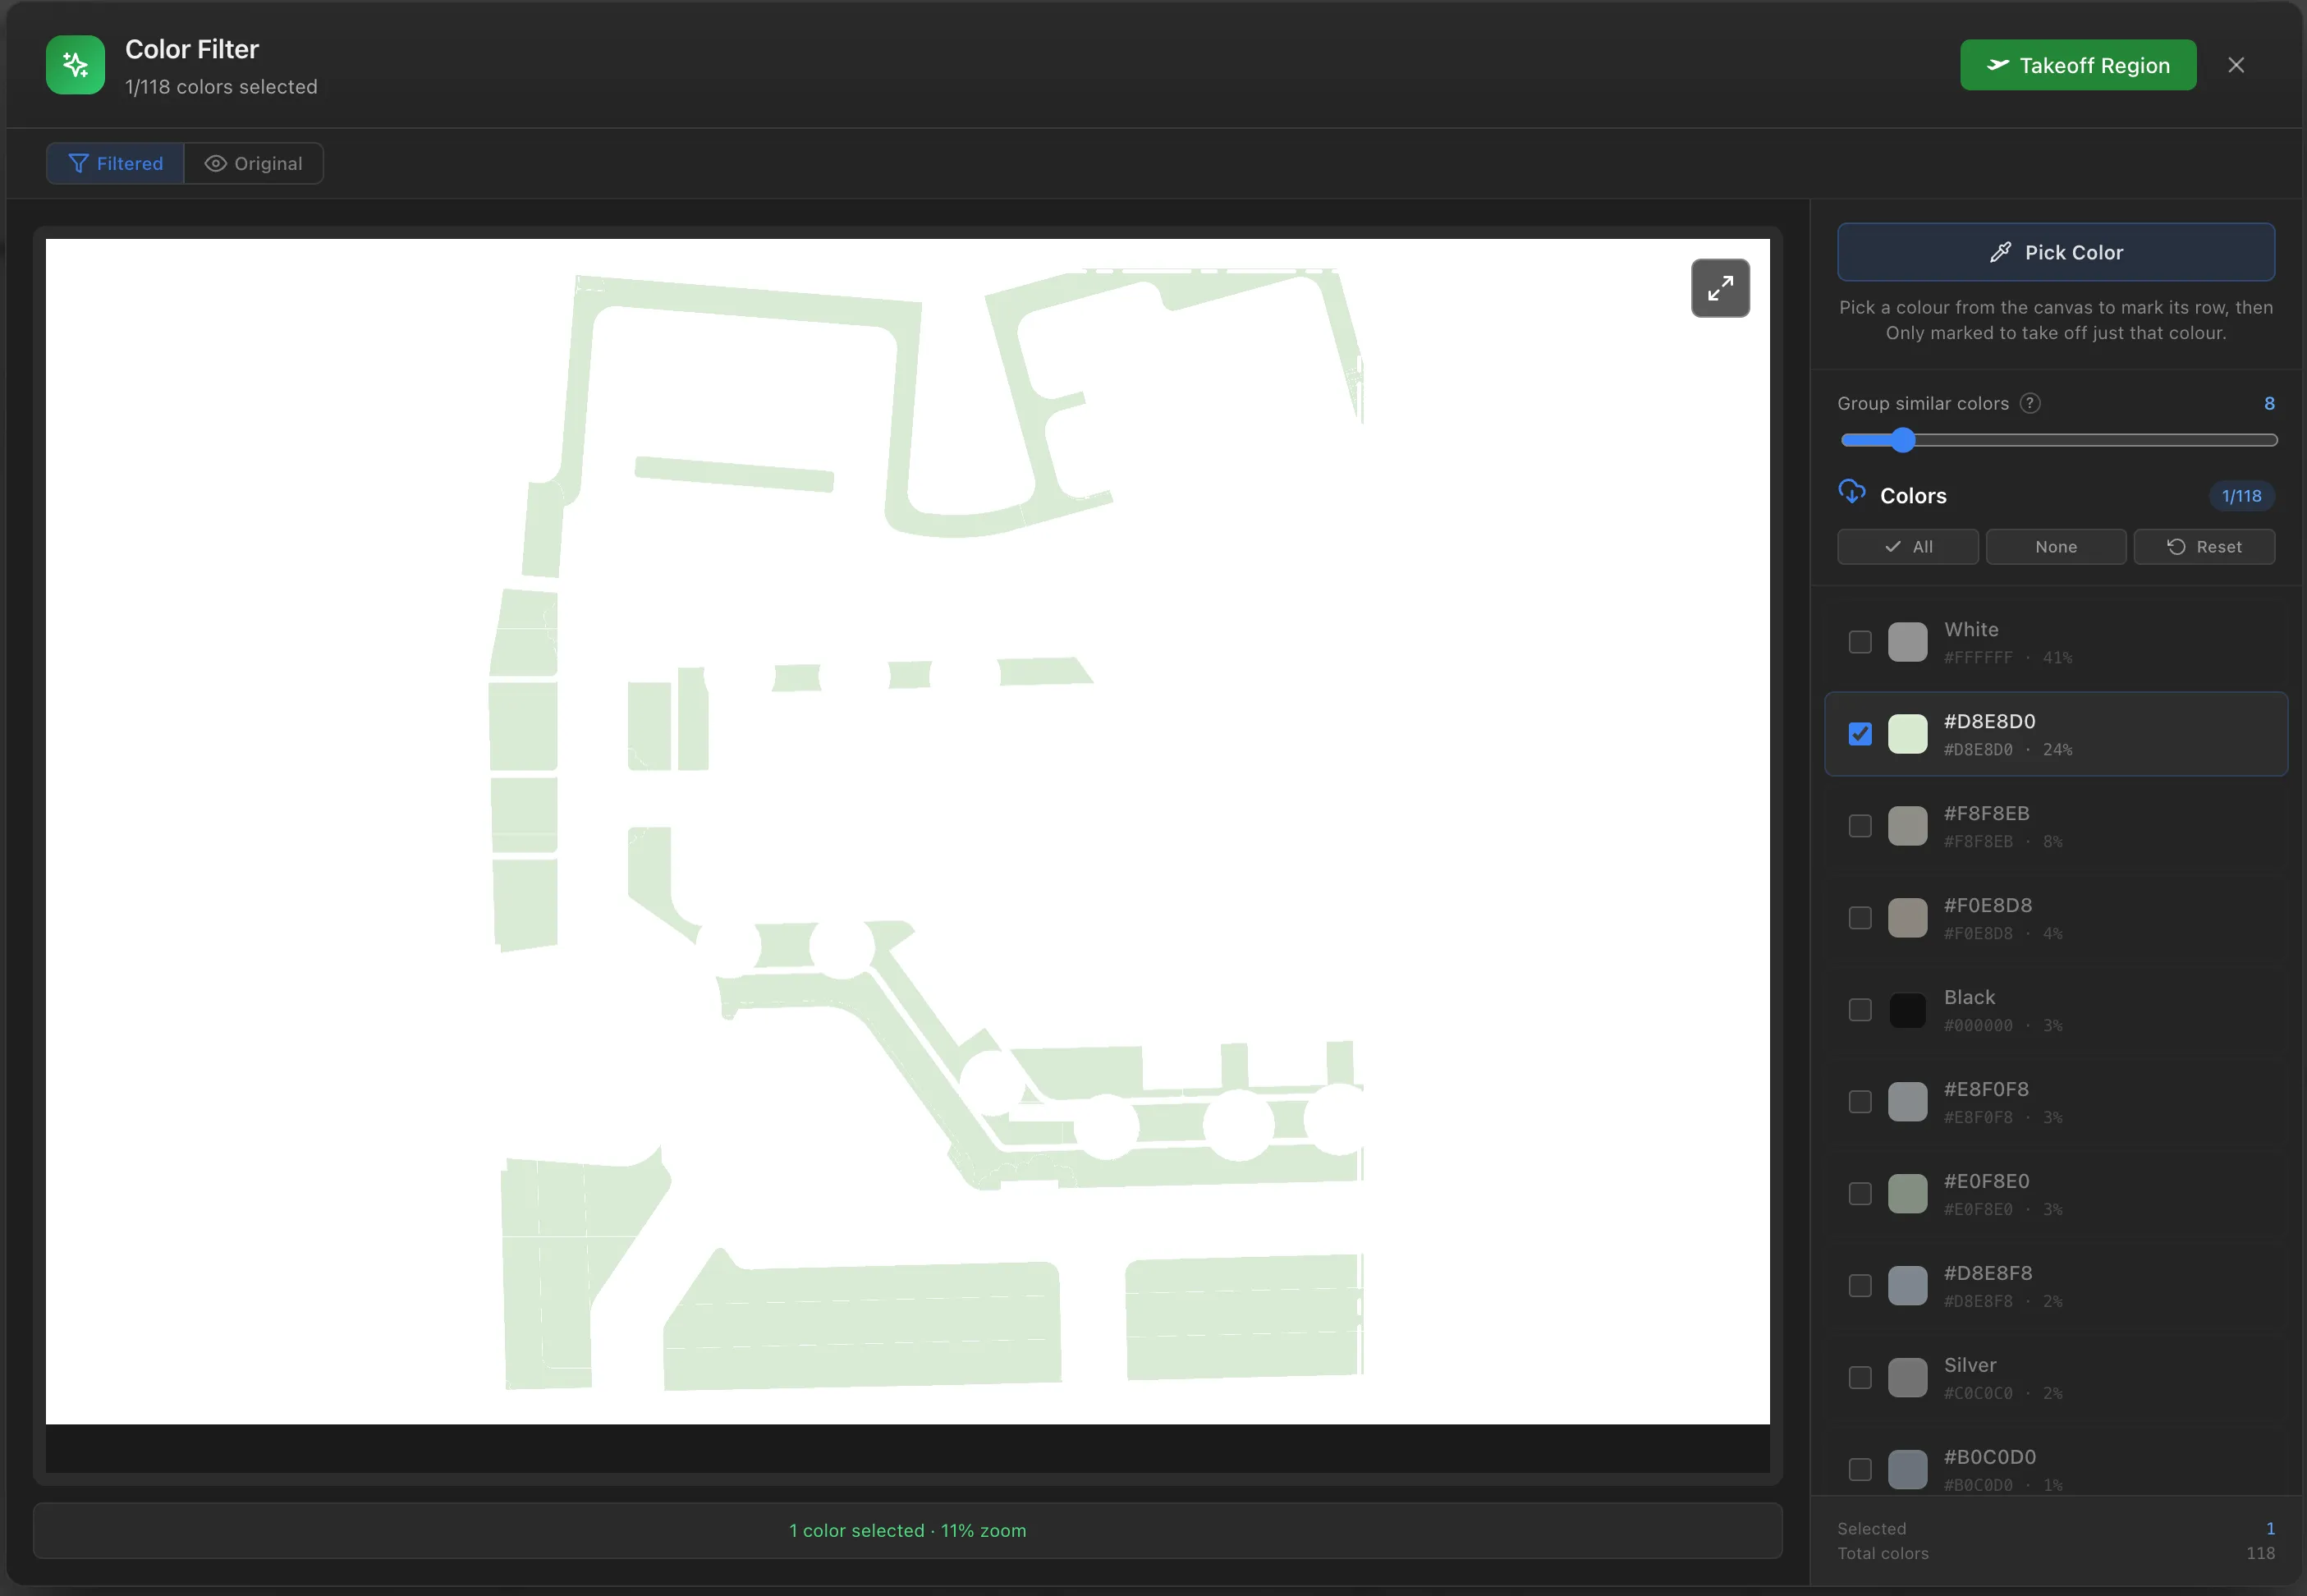
- Click Takeoff Region to measure what is left. Nothing is created until then, so closing the window leaves the takeoff untouched.
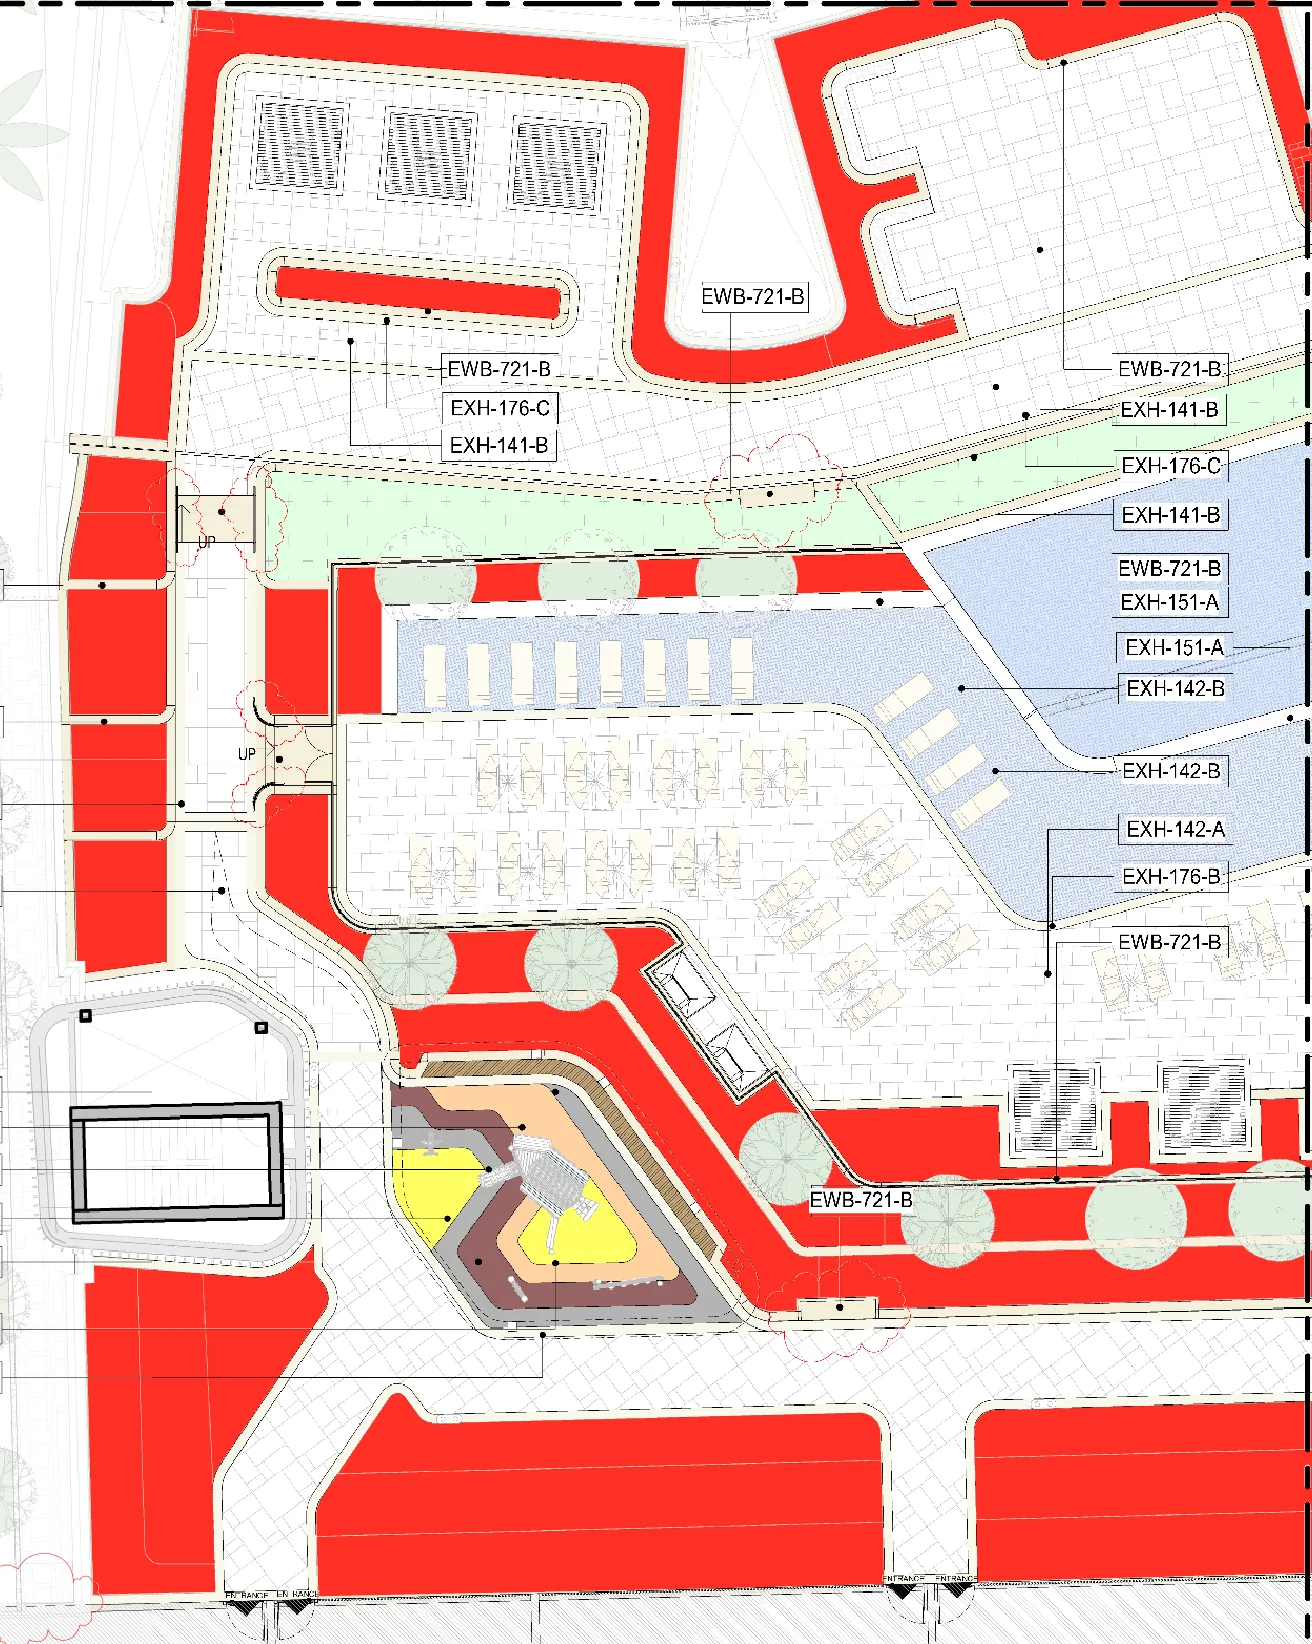
The result honours the fill controls in the canvas bar: Solid Fill or Seal Gaps fill the holes the removed colours leave behind, and Bounding Box Fill replaces the result with its bounding box. Leave them off to keep only the exact pixels of the colours you kept.
The same window is available for a region you have already taken off, from
 Filter colors in its row actions.
Batch Takeoff
Section titled “Batch Takeoff” Batch Takeoff takes off many separate areas in one action. Instead of
clicking one area, waiting, then clicking the next, you place a dot in each area
first and then take them all off together.
It lives in the canvas controls above the drawing, and it needs a region tool selected, since each fill uses that tool’s settings.
There are three modes, and they differ in what the dots become:
| Mode | Key | What the dots become | |
|---|---|---|---|
| Multi | J | One region per dot |
 | Merge | K | One combined region covering everything the dots found |
 | Unmerge | U | A separate region for each piece the dots run across |
Pressing the active mode’s key again turns batch off.
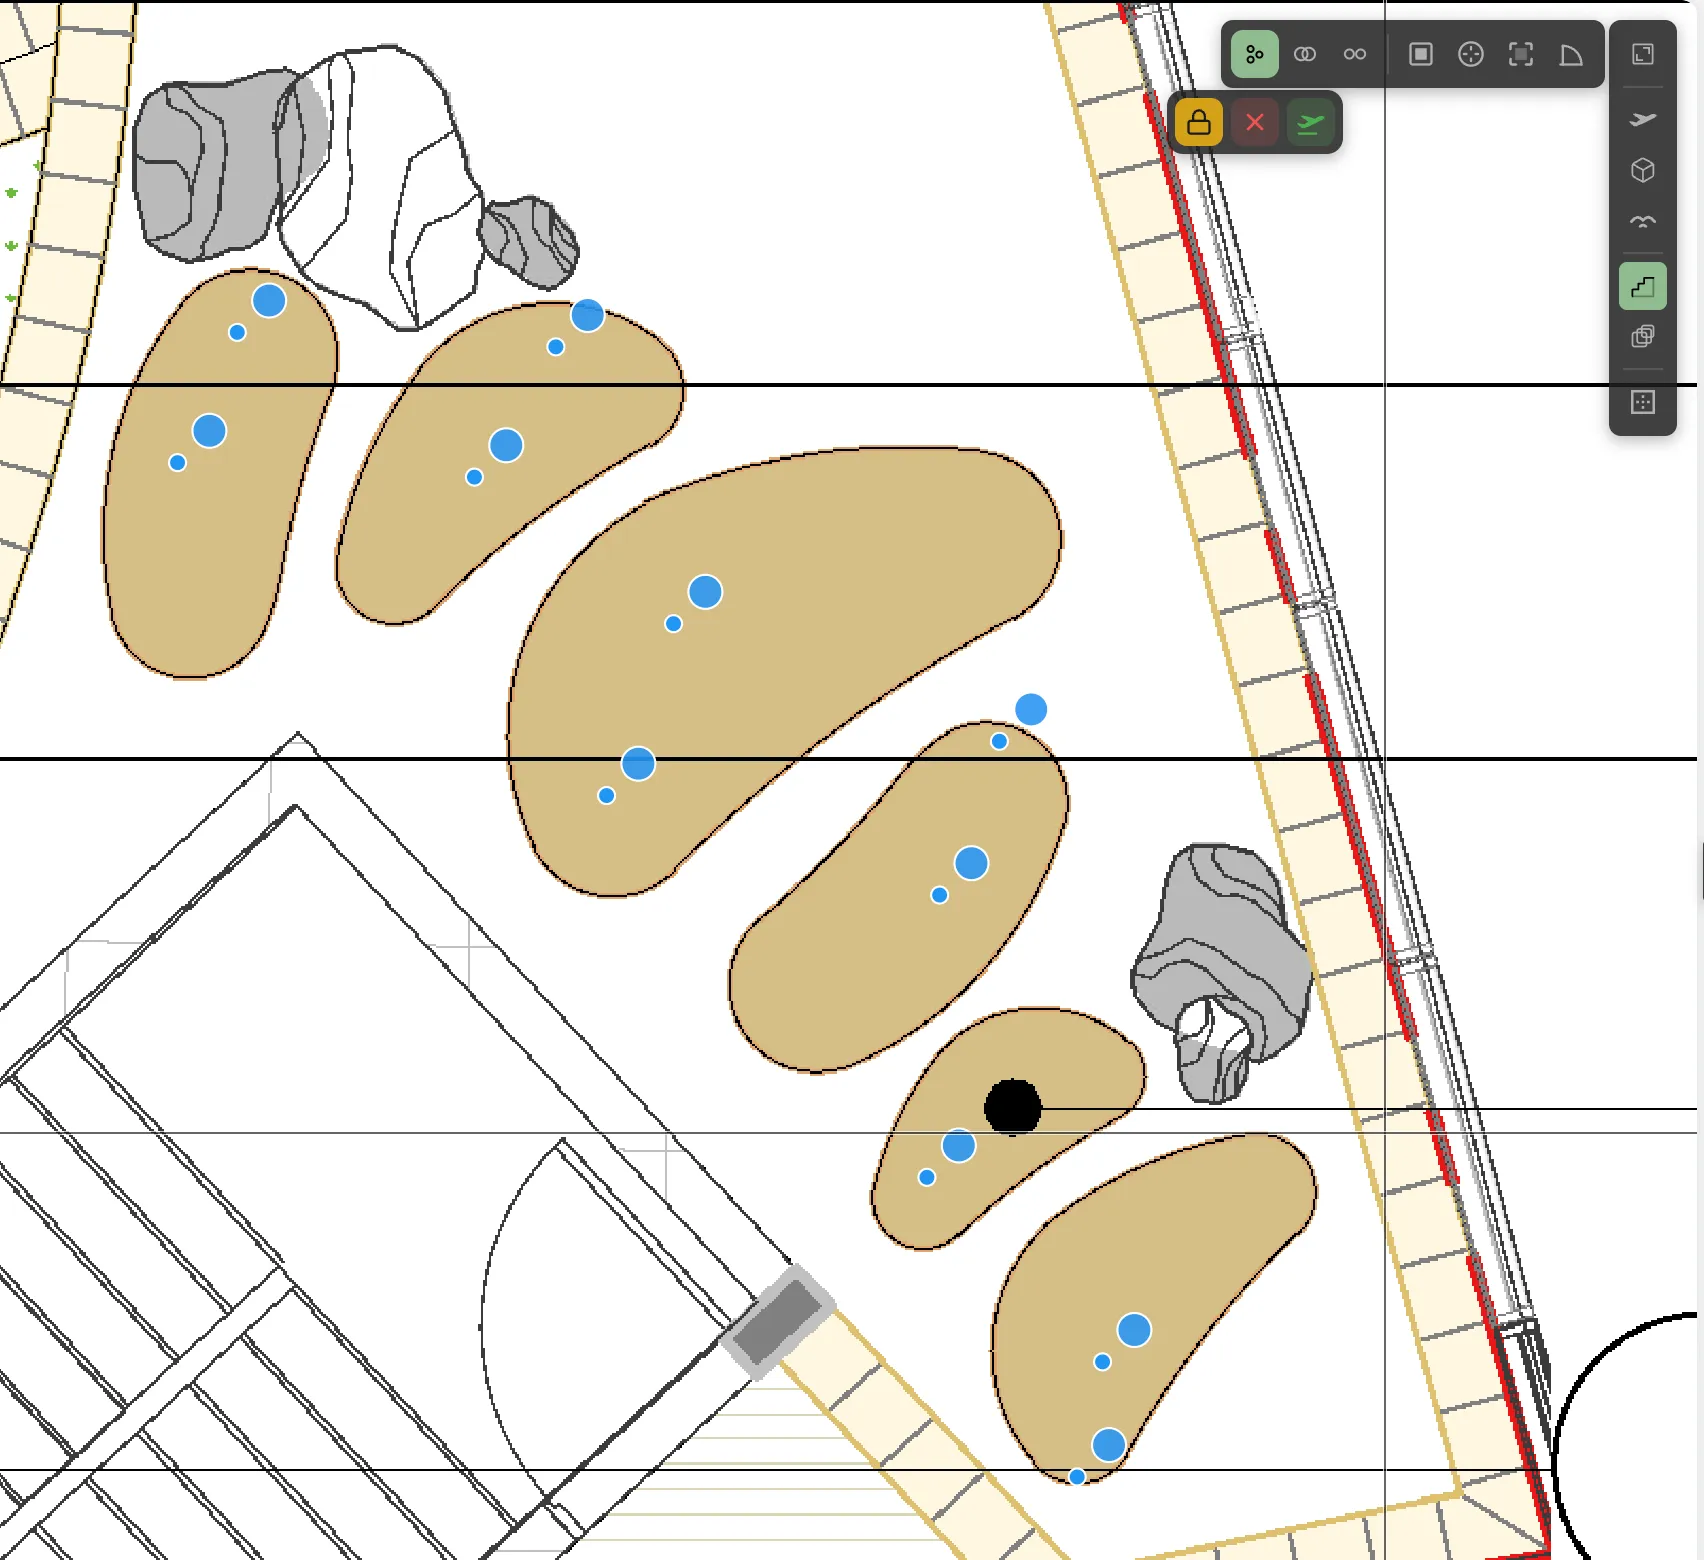
Multi, the everyday case
Section titled “Multi, the everyday case”Several distinct areas of the same material, each becoming its own region in one group. Eight planting beds with a dot in each, ready to go. Nothing has been measured yet, and the three buttons under the mode row are Color Lock, clear the dots and take off:
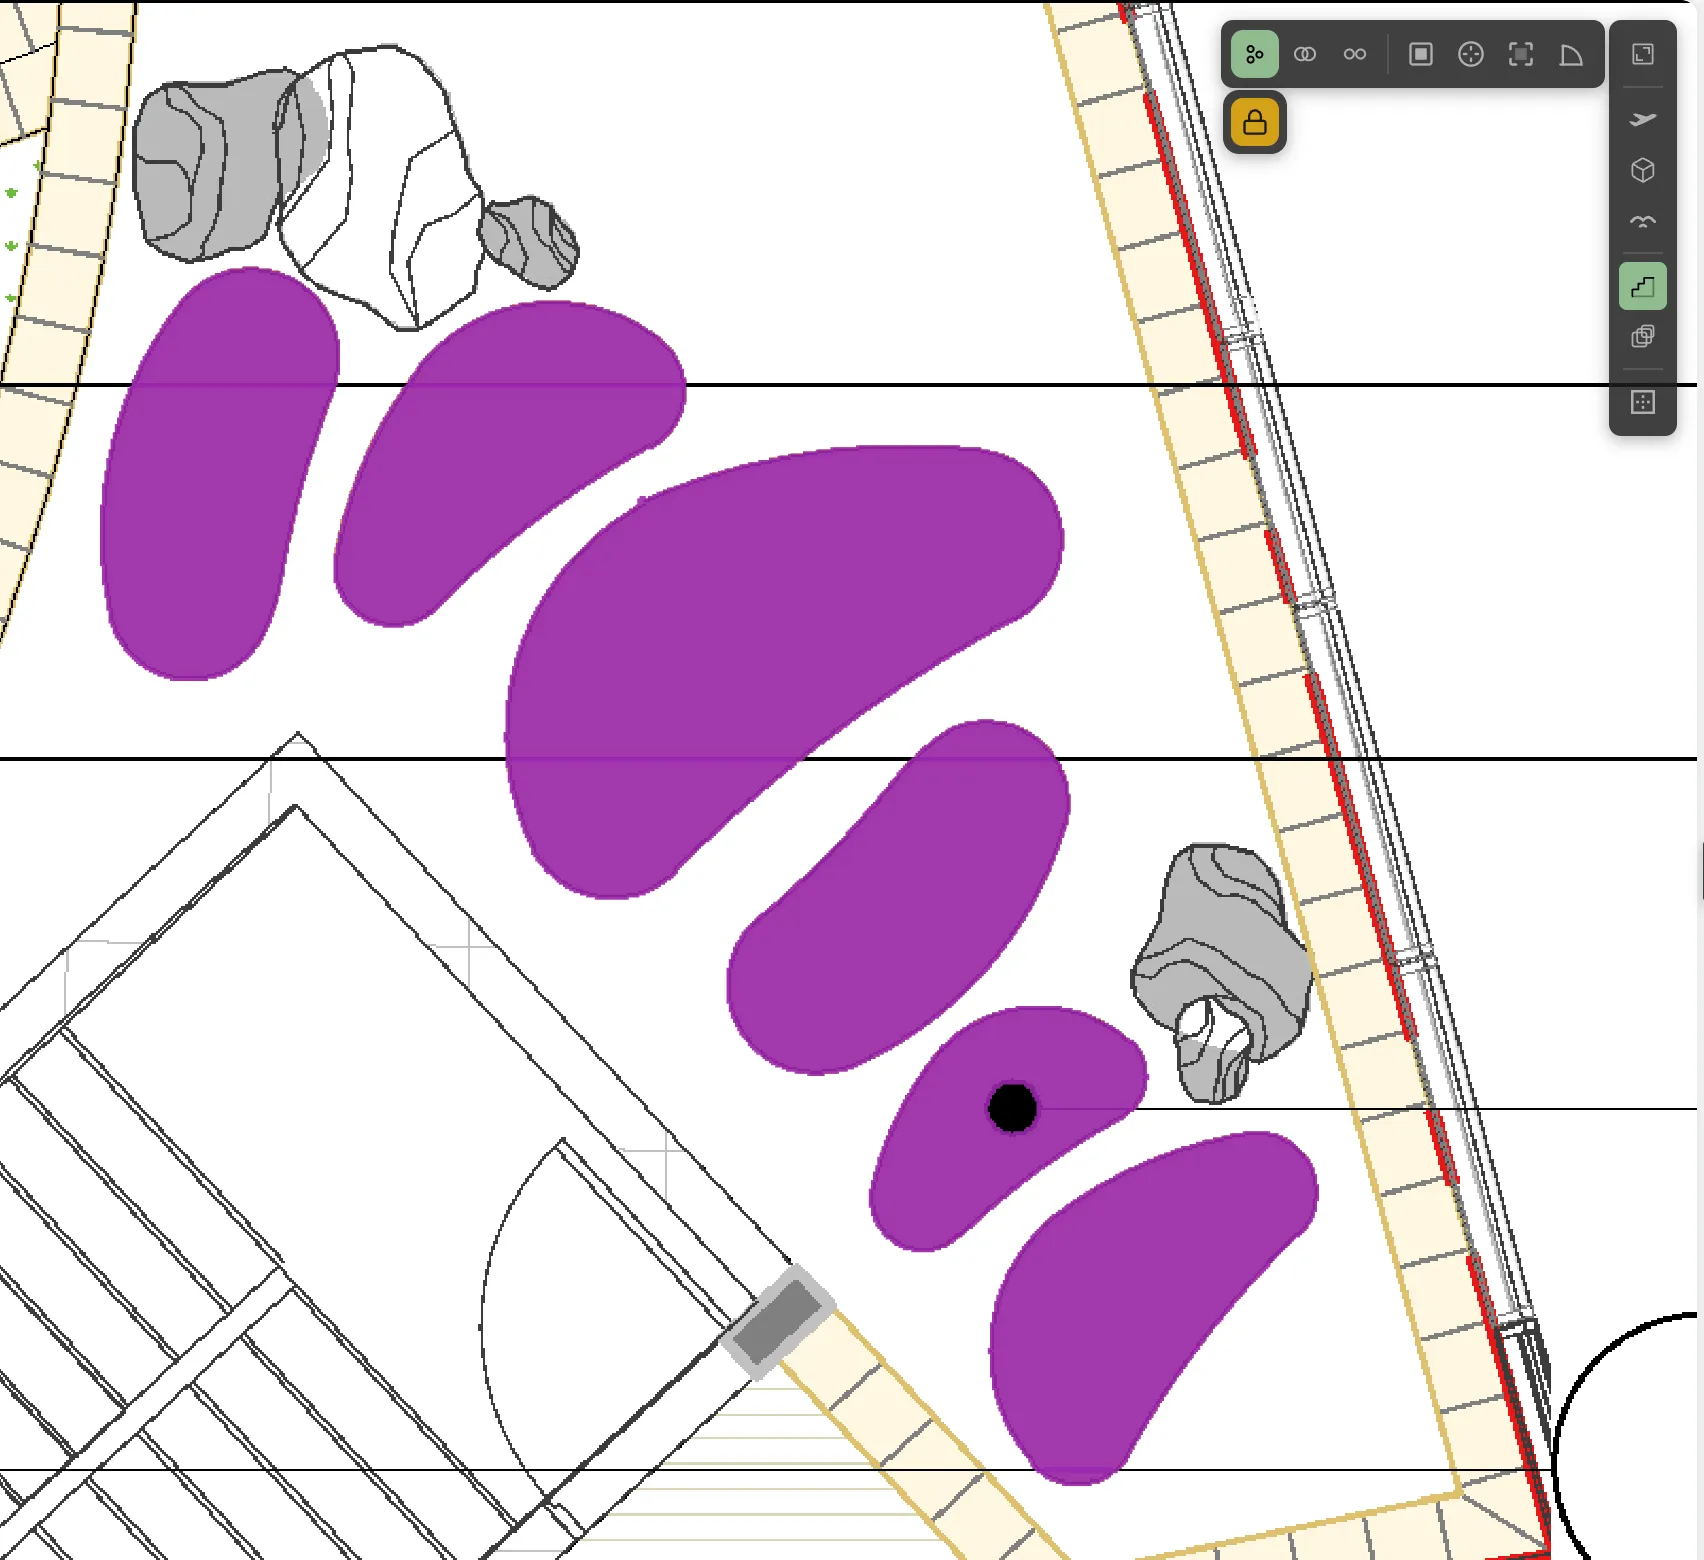
One action later, each bed is its own region in the group:
Merge, when the dots are one item
Section titled “Merge, when the dots are one item”Pick Merge when what the dots find is a single item for pricing. Two dots this time, one at each end of a paved band, with Merge active. The line between them shows what is about to be joined:
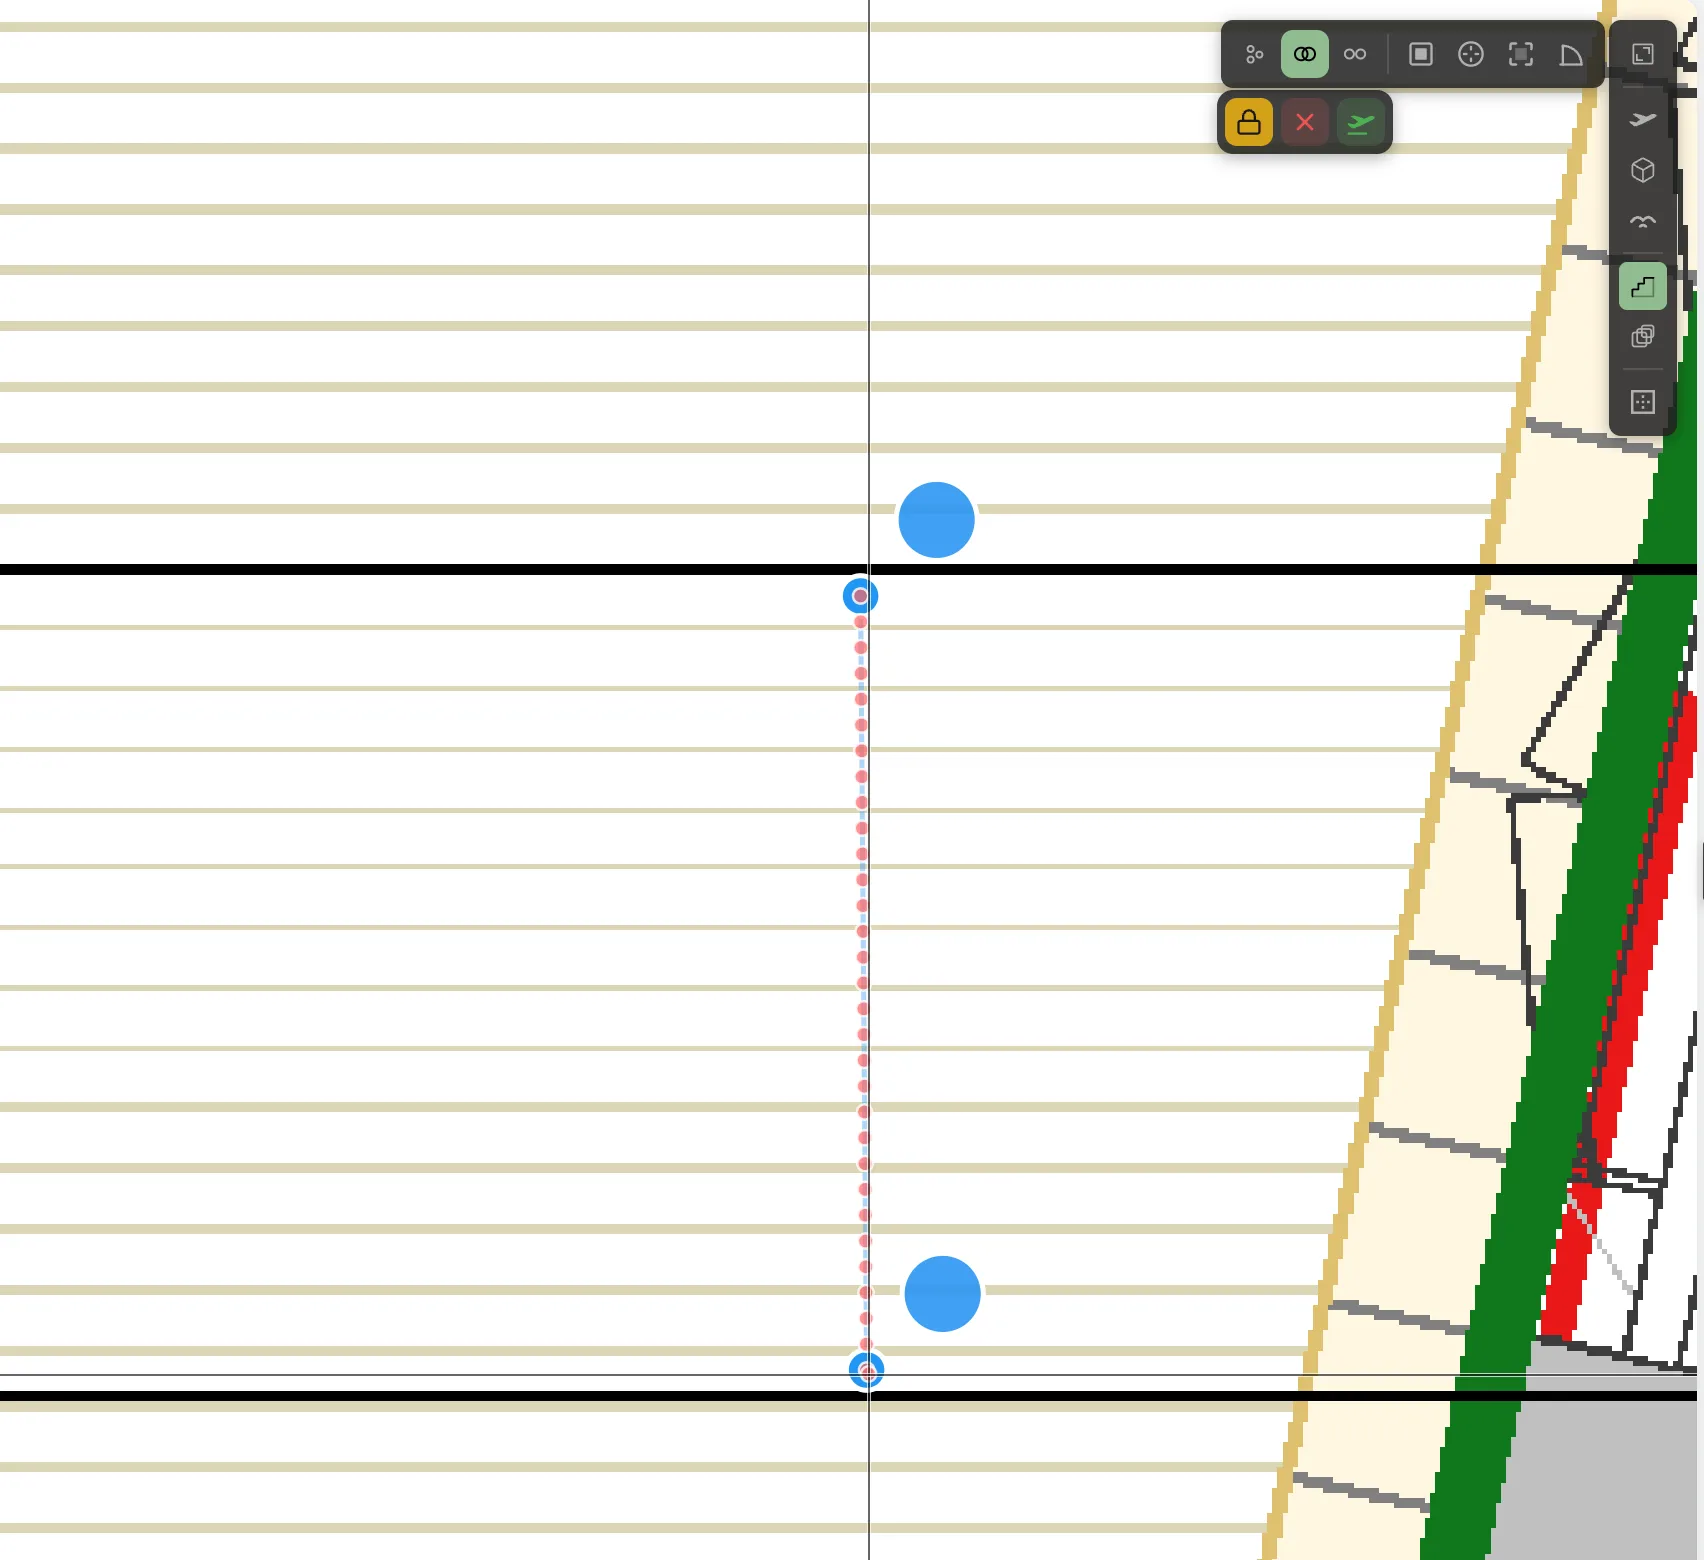
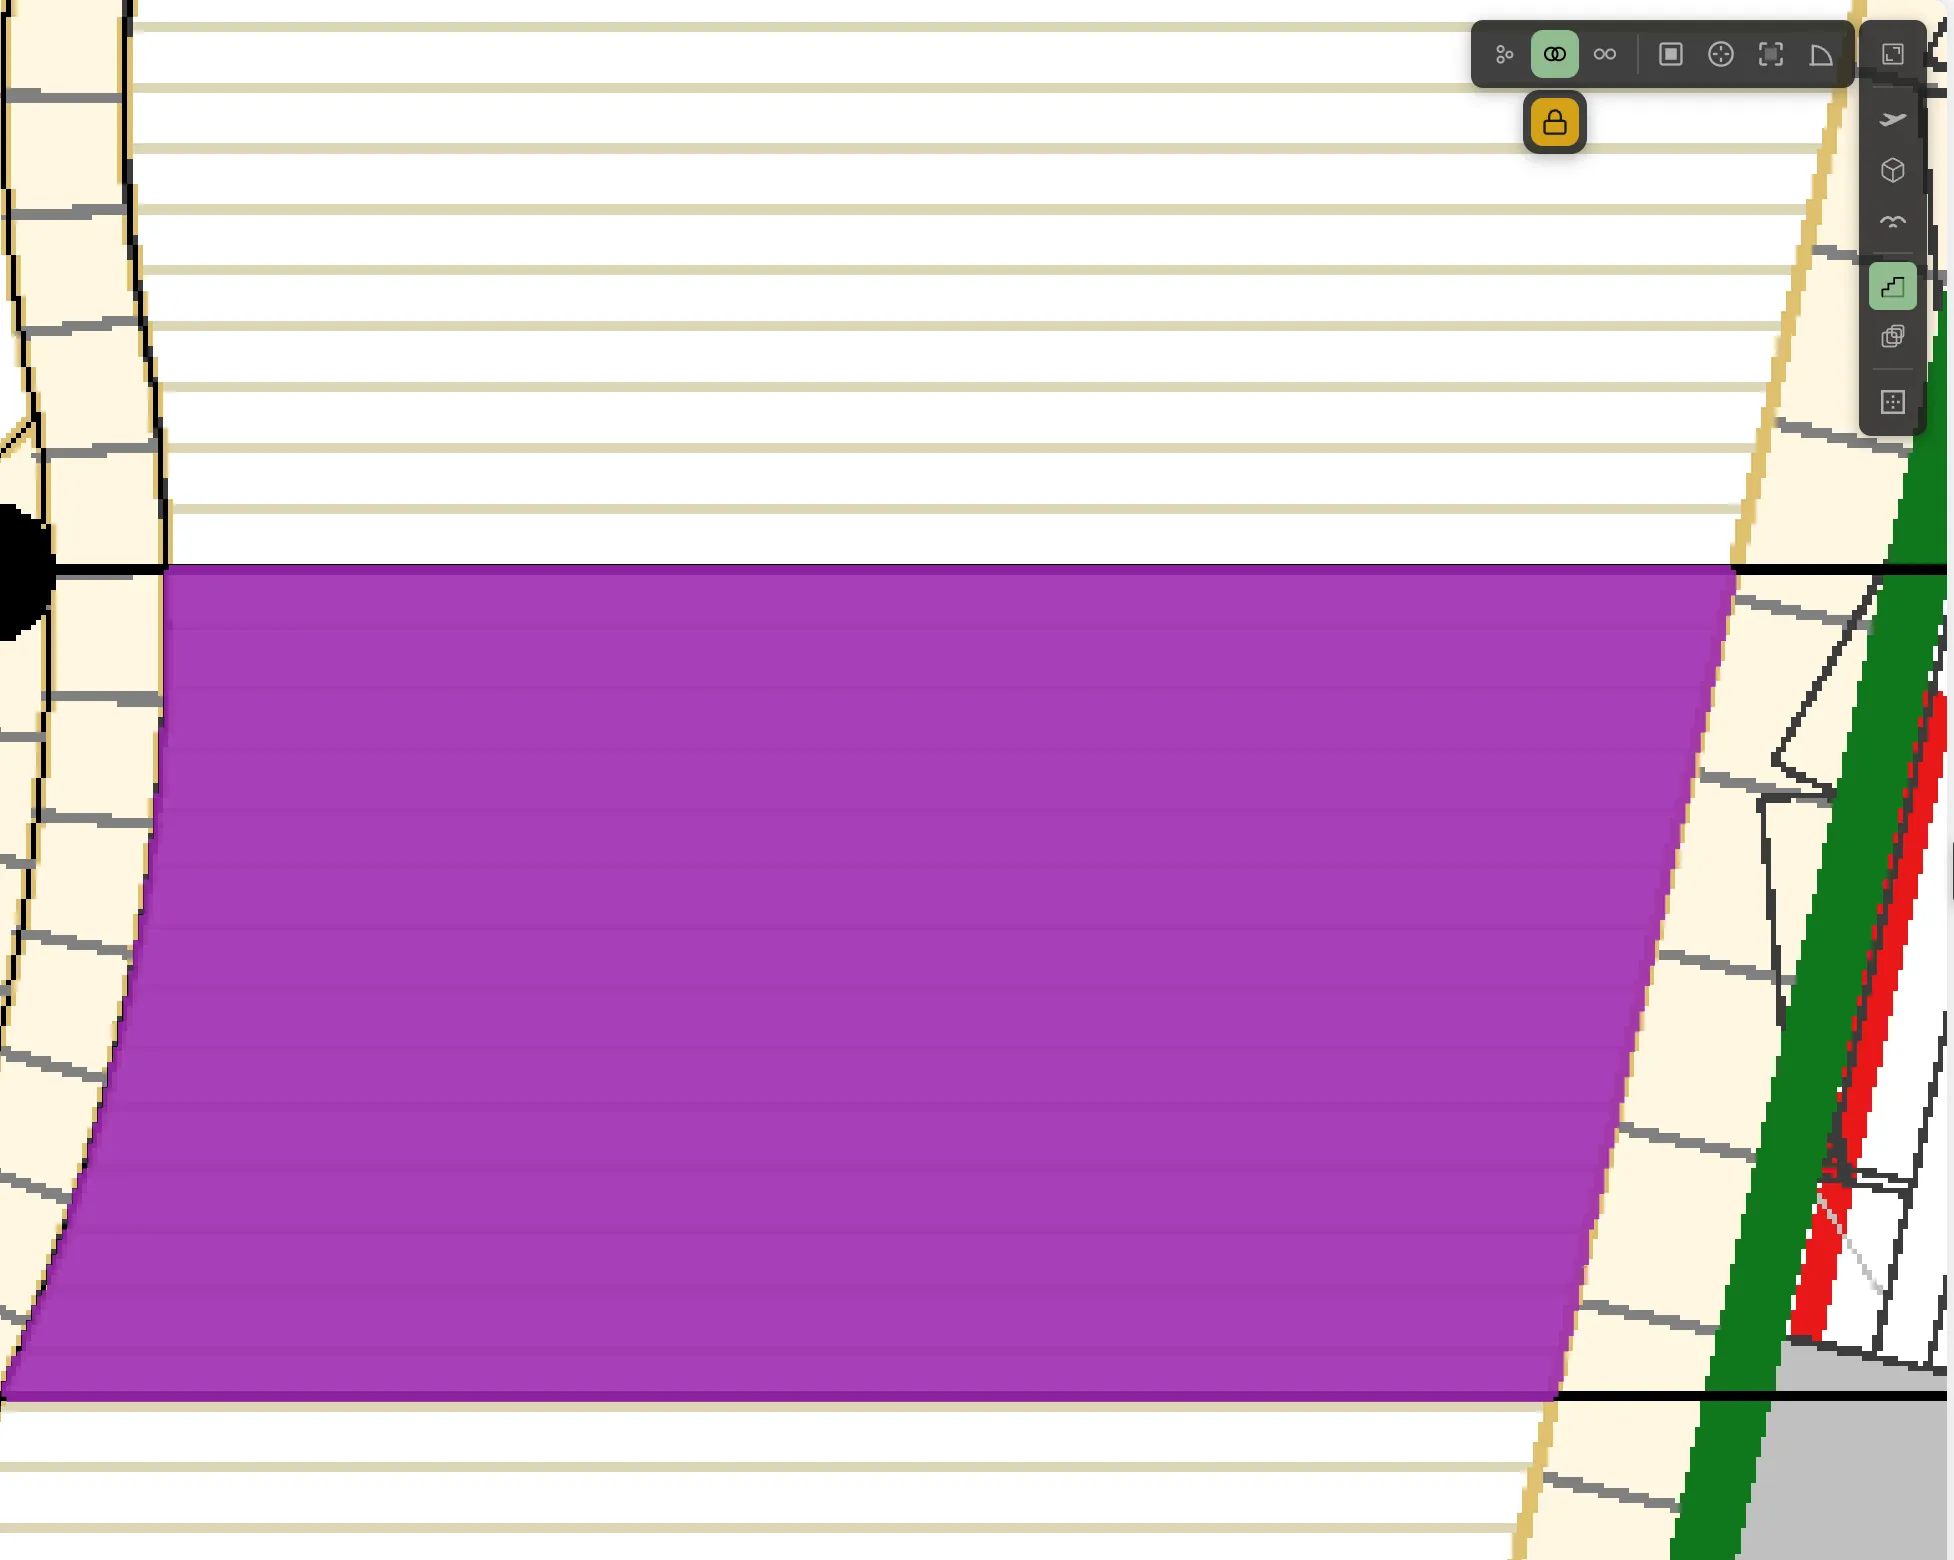
Everything the dots found comes back as one region, not two:
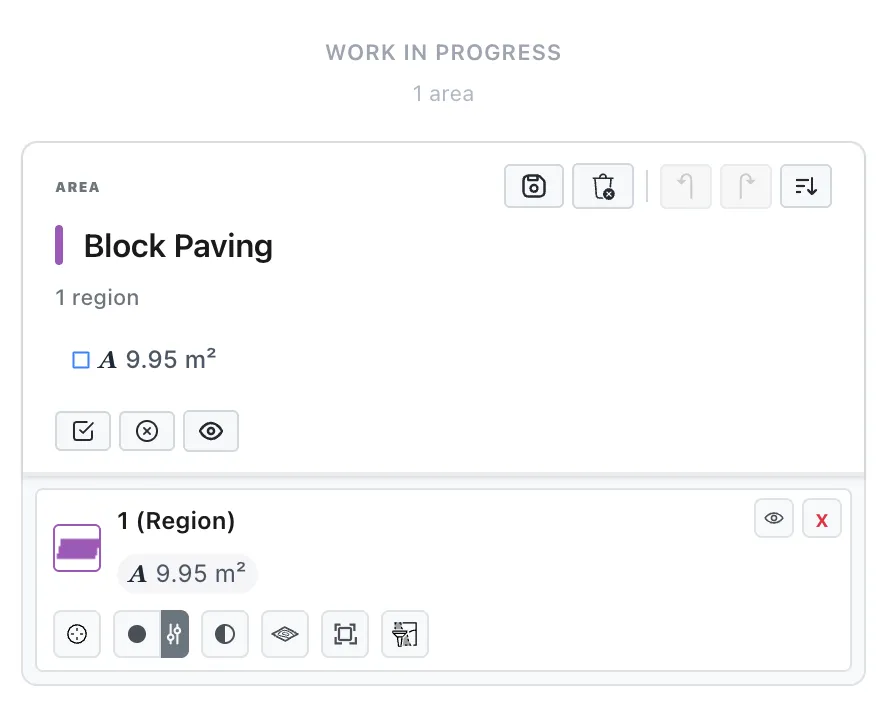
The panel is where the difference shows. One region, one area, nothing left to combine afterwards:
Run the same two dots in Multi and you would get two rows and two areas to add up. That is the whole choice: how many things you want to price, not how many places you clicked.
Unmerge, and why the number changes
Section titled “Unmerge, and why the number changes”Unmerge is the opposite of Merge, and it is not simply “one region per dot”. It gives you a separate region for each piece the dots run across.
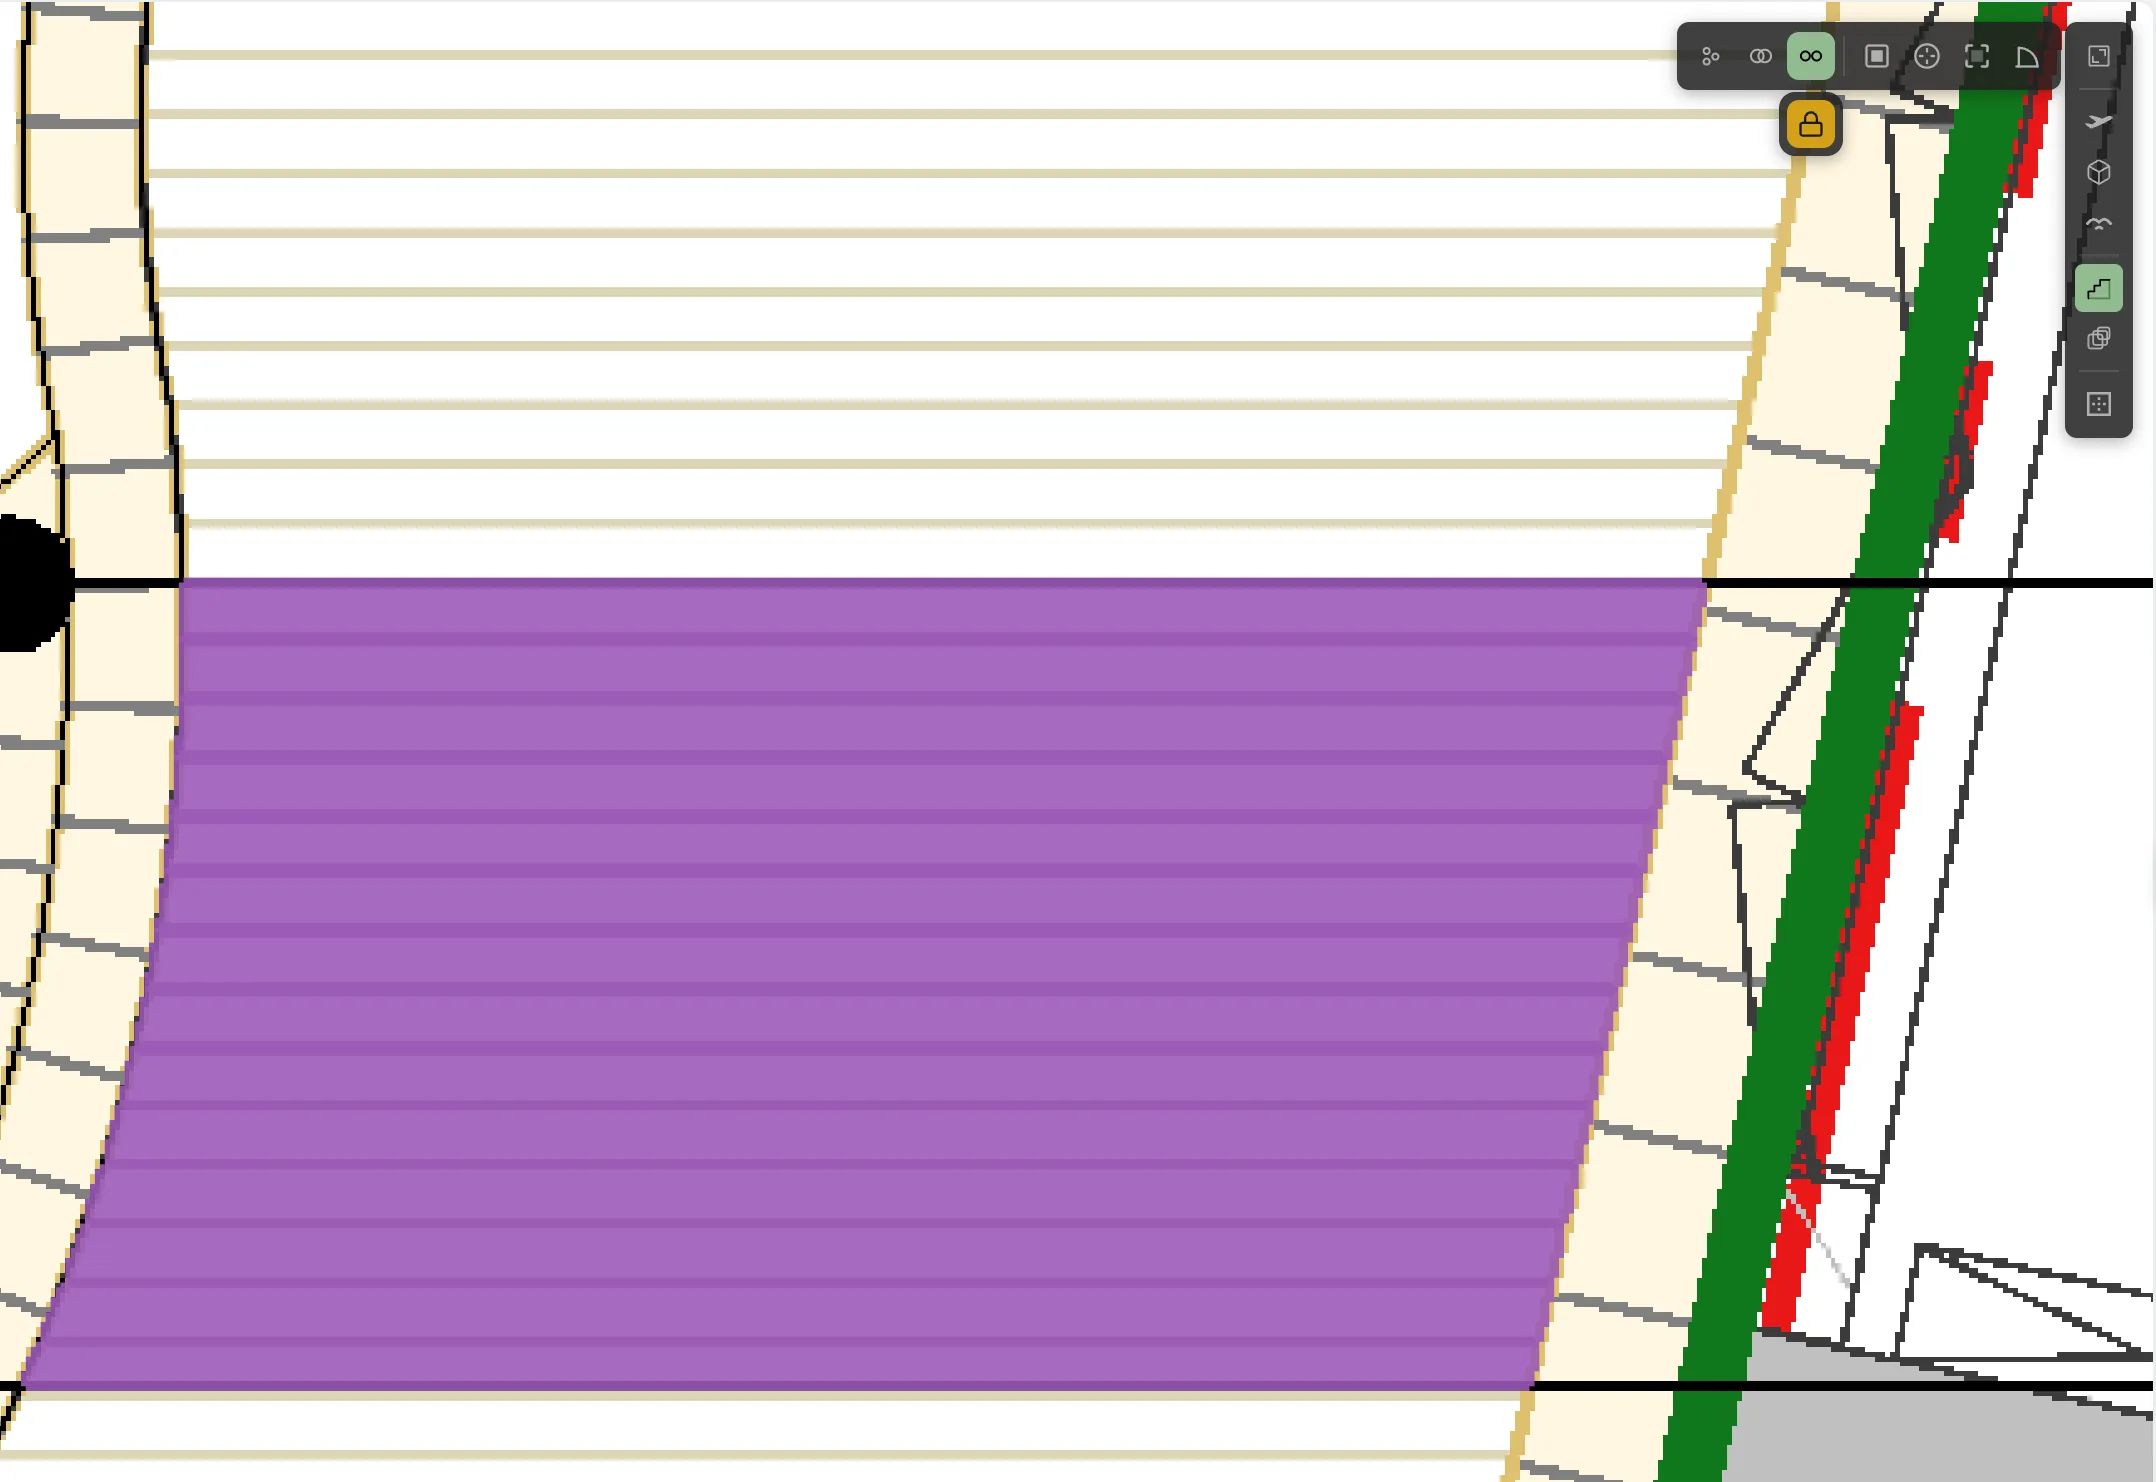
Here is the same band again, same two dots, run in Unmerge. On the drawing it looks much like the merged version:
The panel tells a very different story. Fourteen regions, one for each paving course the dots crossed, each with its own area:
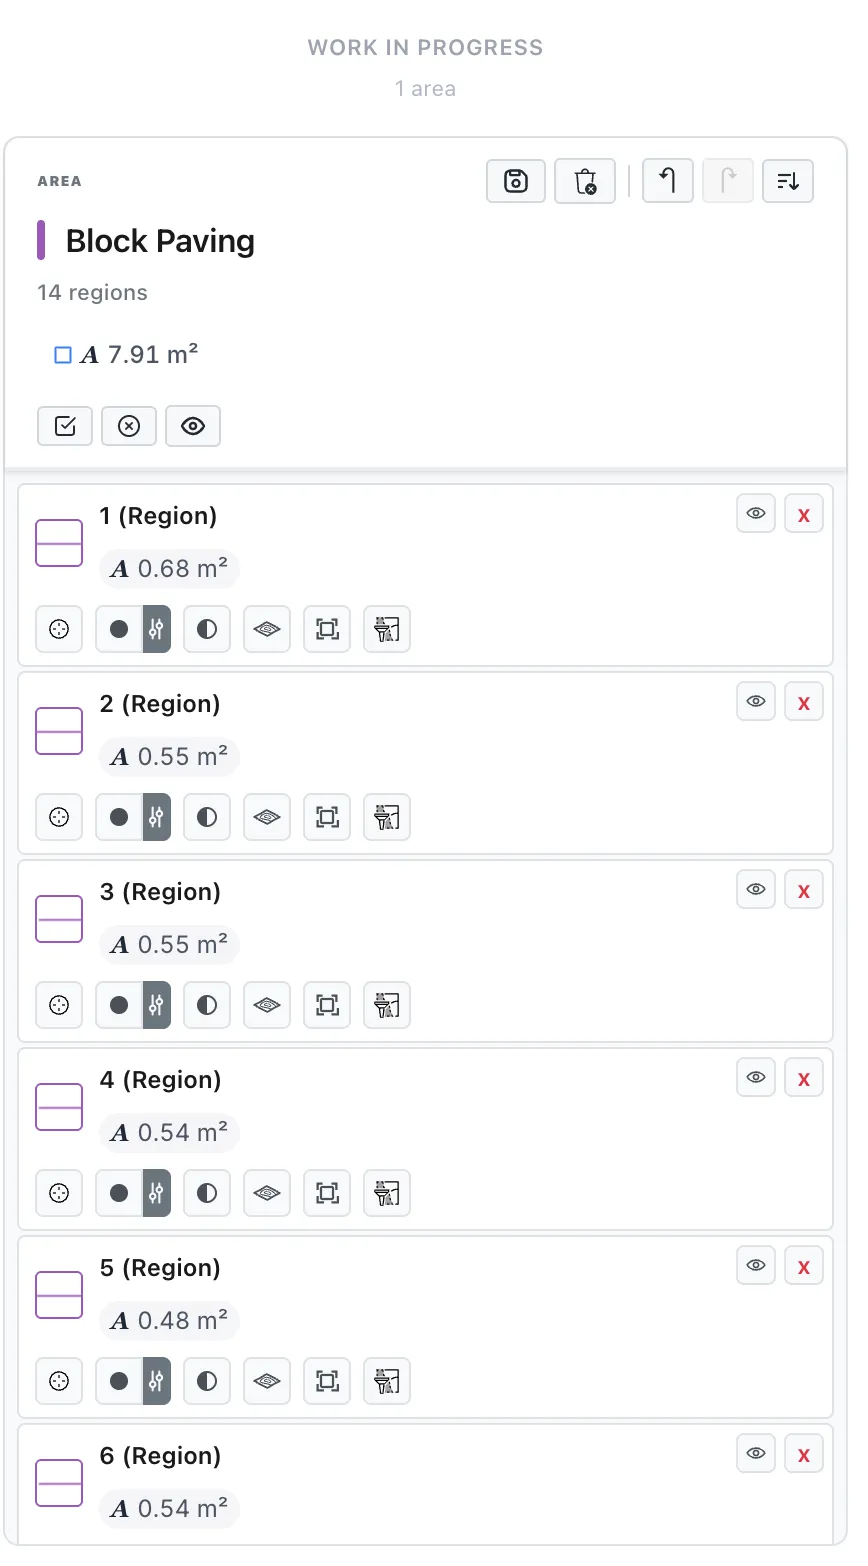
Reach for Unmerge when the pieces are what you price, paving courses or bays you need individually. Reach for Merge when the surface is what you price.
Running a batch
Section titled “Running a batch”Whichever mode you pick, the steps are the same:
- Select a region tool and set the group name and colour as usual.
- Click a batch mode in the canvas controls, or press its key.
- Click a dot inside each area you want.
- Press
Enter, or click the take off button in the flyout, and every area fills in one pass.Escclears the dots instead.
 Color Lock, the padlock in the flyout, works from the
first dot you place. That dot sets the colour, and any later dot sitting on a
different colour is skipped, so one pass does not pick up two materials by
accident. Place your first dot on the material you actually want.
Color Lock, the padlock in the flyout, works from the
first dot you place. That dot sets the colour, and any later dot sitting on a
different colour is skipped, so one pass does not pick up two materials by
accident. Place your first dot on the material you actually want.
Checking your work
Section titled “Checking your work”Before you move to the next material:
- Compare against the drawing. Does the coloured area actually cover what you intended, with nothing missed and nothing extra?
- Sanity check the number. A courtyard reading 4 m² or 40,000 m² is telling you something is wrong, usually the scale.
- Look for overlaps. Two regions covering the same ground will count that ground twice.
Fixing mistakes
Section titled “Fixing mistakes”- Remove part of an area: use the
 Eraser (
E). Quantities update as soon as you erase. - Remove a whole region: select it in the right panel and delete it with its
 button.
 - Undo: the usual undo shortcut steps back through your actions.
- Reshape: regions with editable outlines offer
 Reshape
Polygon, so you can drag the points to adjust.
Reshape
Polygon, so you can drag the points to adjust.
Erasing recalculates the area immediately, so the group total always reflects what is actually on the drawing.
Common questions
Section titled “Common questions”Can two regions overlap? A new region will not claim ground that an existing region has already measured, so ordinary work does not double count. The exception is a duplicated region left sitting on top of its original, which counts twice because a copy is treated as a second real item.
Why is my region a different area than I expected? Check the scale first, since that is the usual cause. If the scale is right, zoom in and confirm the fill actually covers what you think it covers.
Can I change a group’s colour later? Yes, with  Edit Group in the
layer panel. The
measurement does not change, only how it is drawn and labelled.
Edit Group in the
layer panel. The
measurement does not change, only how it is drawn and labelled.