

Find Pattern
 Find Pattern (
G) answers one question: where else does this appear on the drawing?
Show it one example of a detail, a repeated arrangement, a paving motif, a planting cluster, and it searches the drawing and highlights every area where that pattern appears. You then review the matches and choose which to show as boxes on the drawing.
Find Pattern locates. It does not measure or count, so nothing it finds enters your quantities. Its job is to make sure you have not missed an instance before you take off or count each one with the normal tools.
Find Pattern or Auto Count?
Section titled “Find Pattern or Auto Count?”The two look similar, and choosing the right one saves time.
| You want to | Use |
|---|---|
| Count a repeated symbol and place a marker on each |  Auto Count ( Auto Count (A) |
| See every place a detail or arrangement appears, before deciding what to do about it | Find Pattern (G) |
Auto Count produces a count. Find Pattern produces locations. If the answer you need is a number, go straight to Auto Count. If the answer you need is “show me where”, this is the tool.
Typical uses: finding every occurrence of a paving band before taking each one off, locating all instances of a planting arrangement across a large site plan, or confirming a detail called up in a note really does appear only twice.
How to use it
Section titled “How to use it”- Select Find Pattern (
G). A panel appears with two steps. - Step 1: Select Search Area. Draw a box over the part of the drawing you want searched. Searching only where the pattern could plausibly be keeps the search quick and the results clean.
- Step 2: Select Pattern. Draw a box around one clear example of the
pattern you want to find. Press
Escif you need to go back a step, or use Reset to redraw the search area. - The Find Pattern window opens with your example shown as the Template. When it reads Ready to search this pattern, adjust the settings if needed and click Start Search.
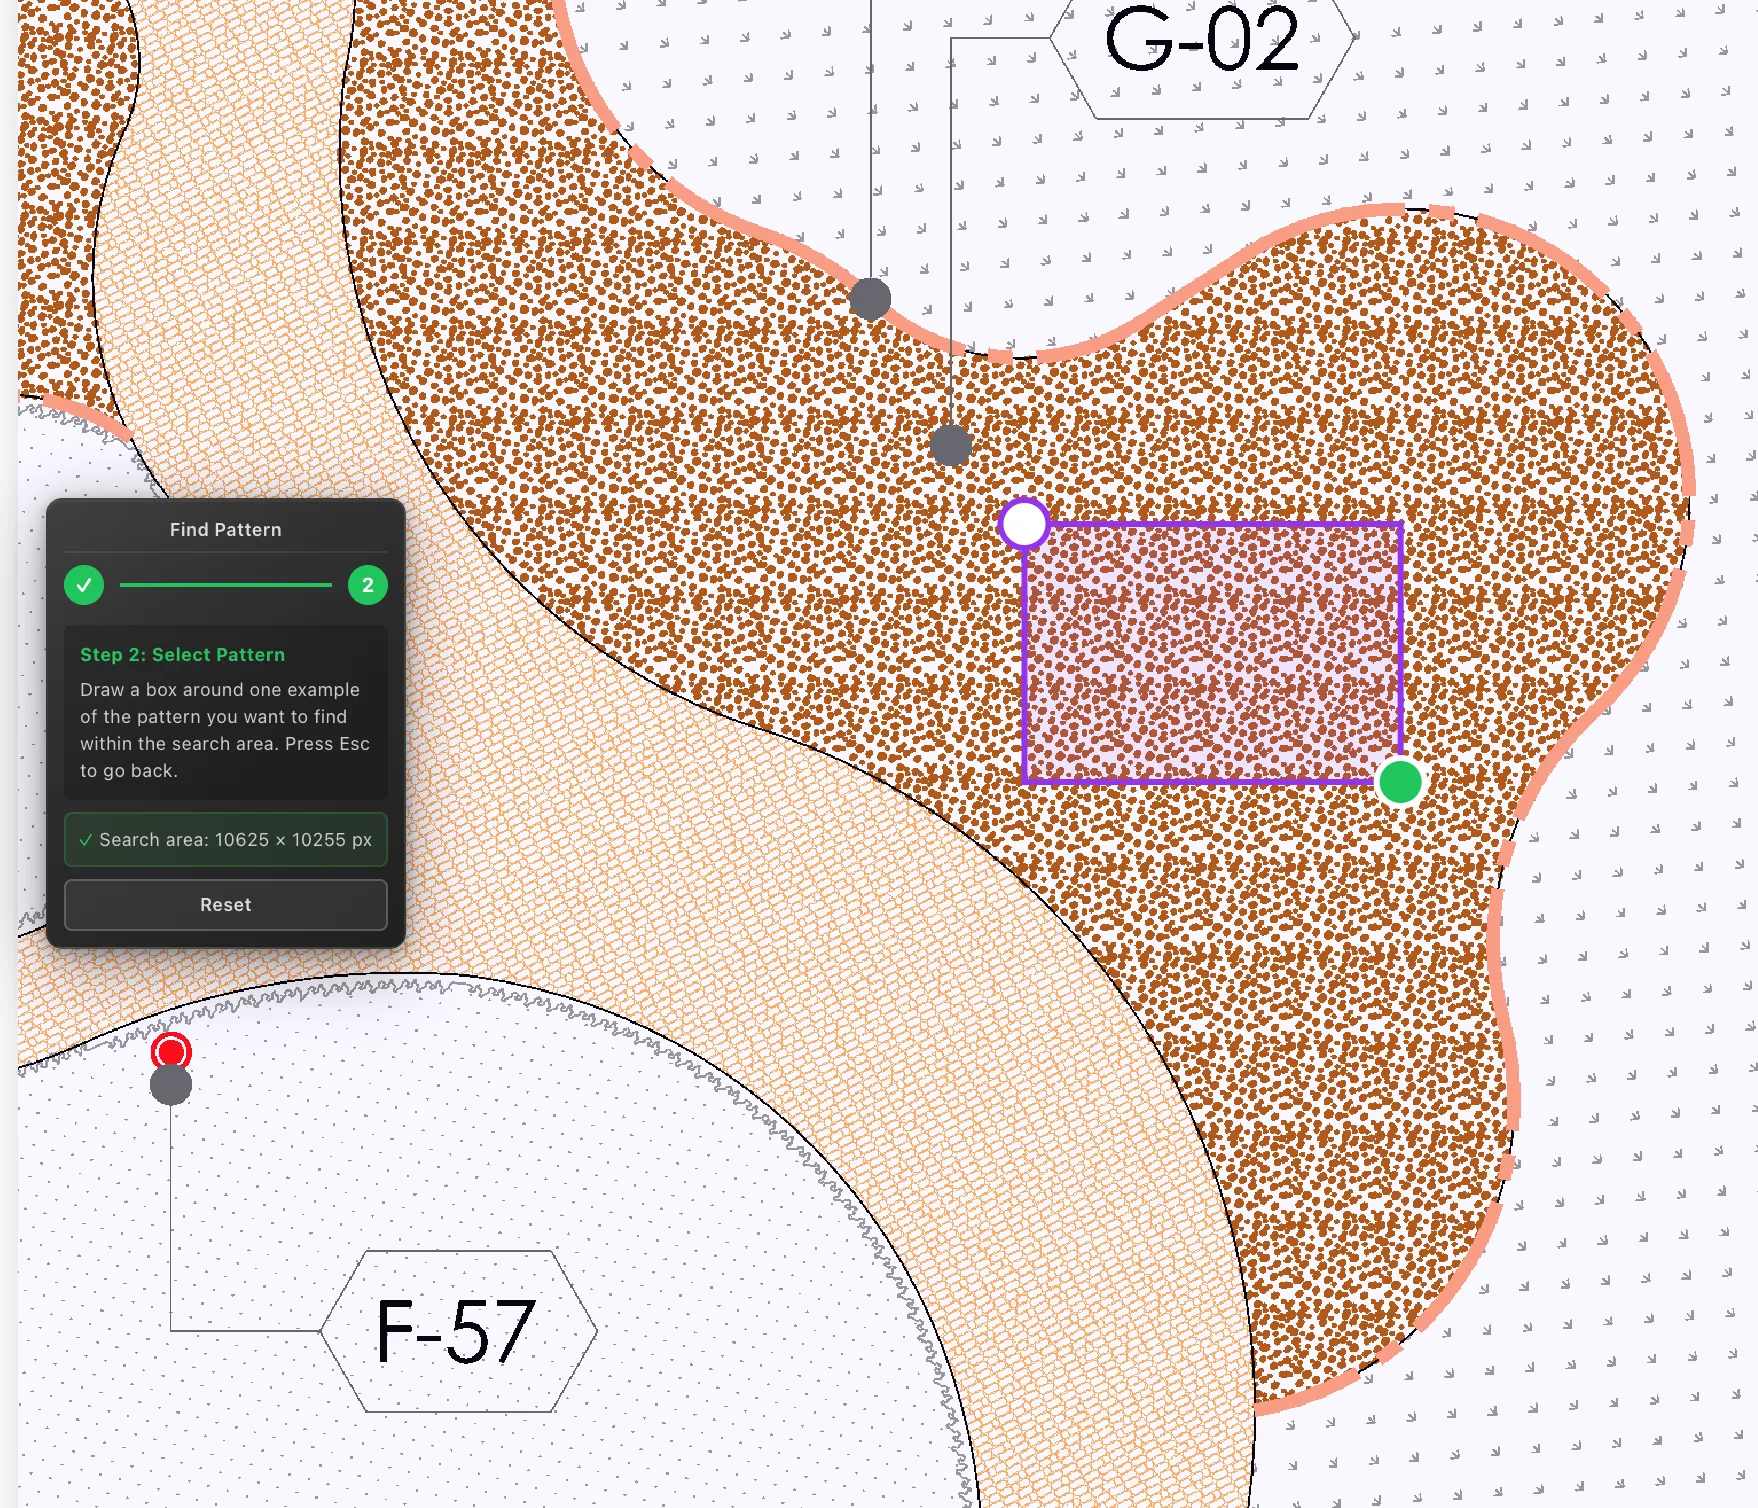
The panel stays on the canvas while you work, confirming the search area behind you and telling you what to do next. Here it is at step 2, with a box being drawn around one patch of gravel:
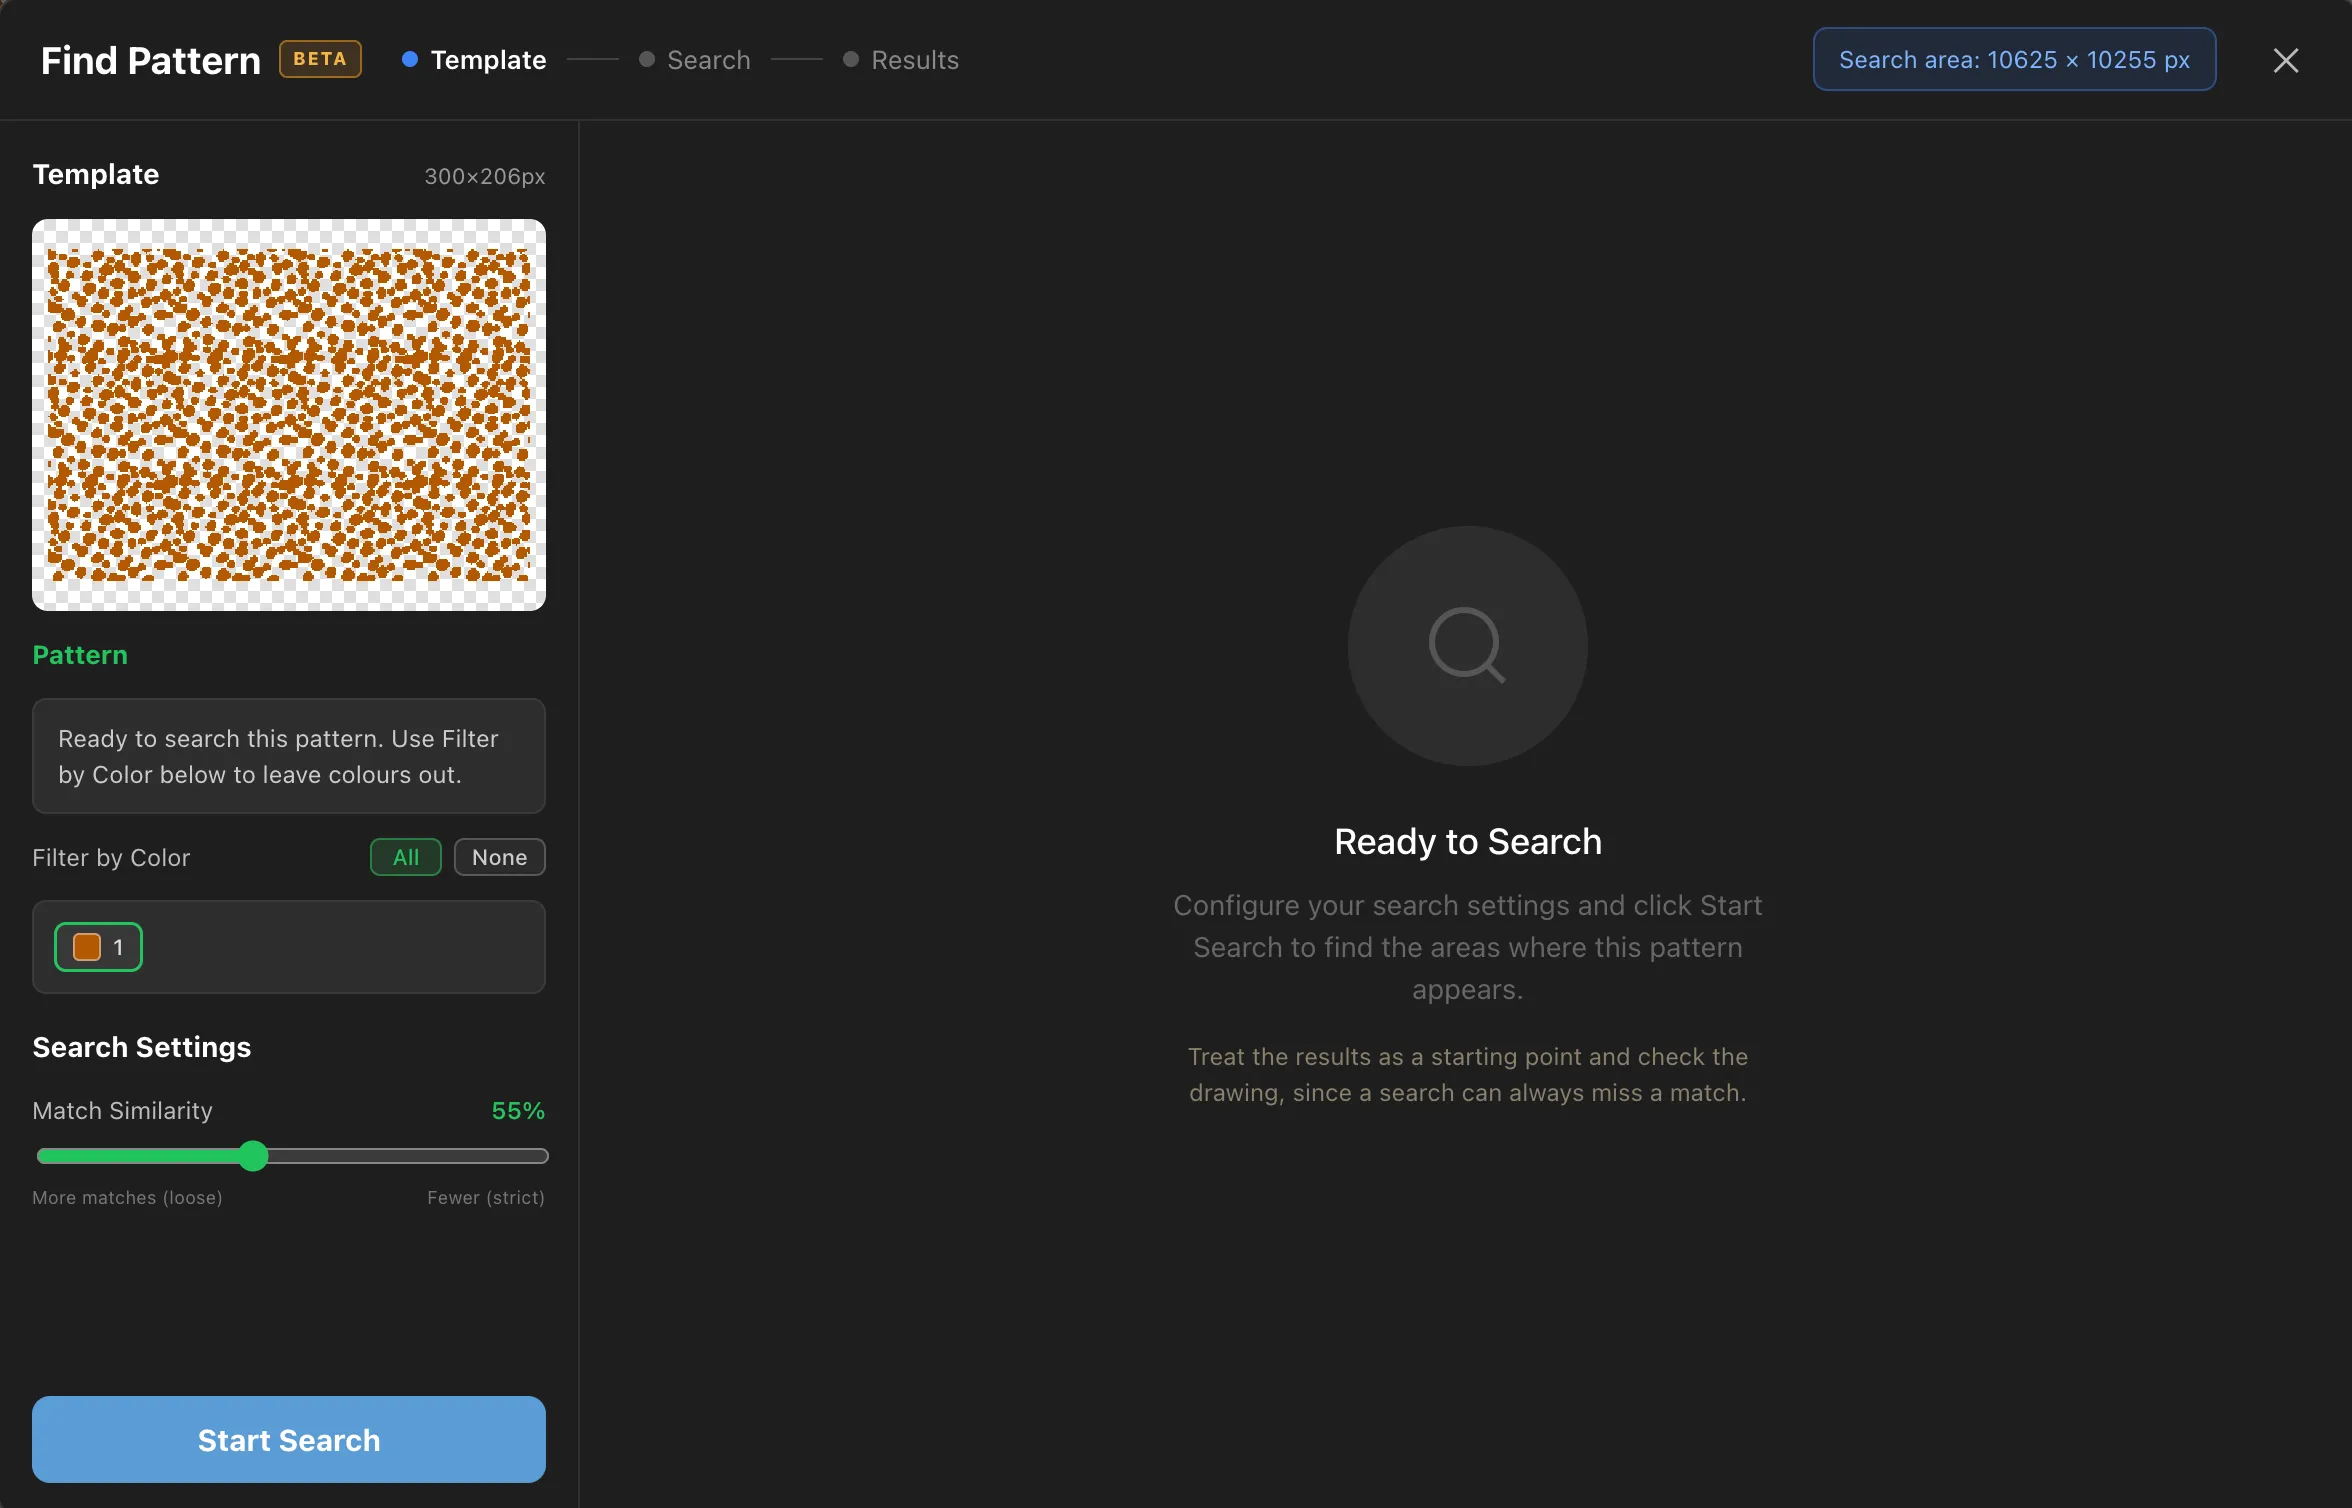
The window has its own indicator across the top, Template, Search, Results, so you can see how far through you are.
The search settings
Section titled “The search settings”Match Similarity controls how closely a candidate must resemble your example, shown as a percentage. Slide toward Fewer (strict) to cut out weak matches, or toward More matches (loose) to catch variants you are missing.
Filter by Color lists the colours found in your example, each with a count. Turn a colour off to leave it out of the search, which is useful when your example box unavoidably caught a background element or an unrelated line. All and None set every colour at once.
A search shows its progress and can be stopped at any time with Cancel Search.
Reviewing the results
Section titled “Reviewing the results”Matches arrive as cards, sorted by match strength, with the strongest first and a preview of each area found. The header reads Found in N areas.
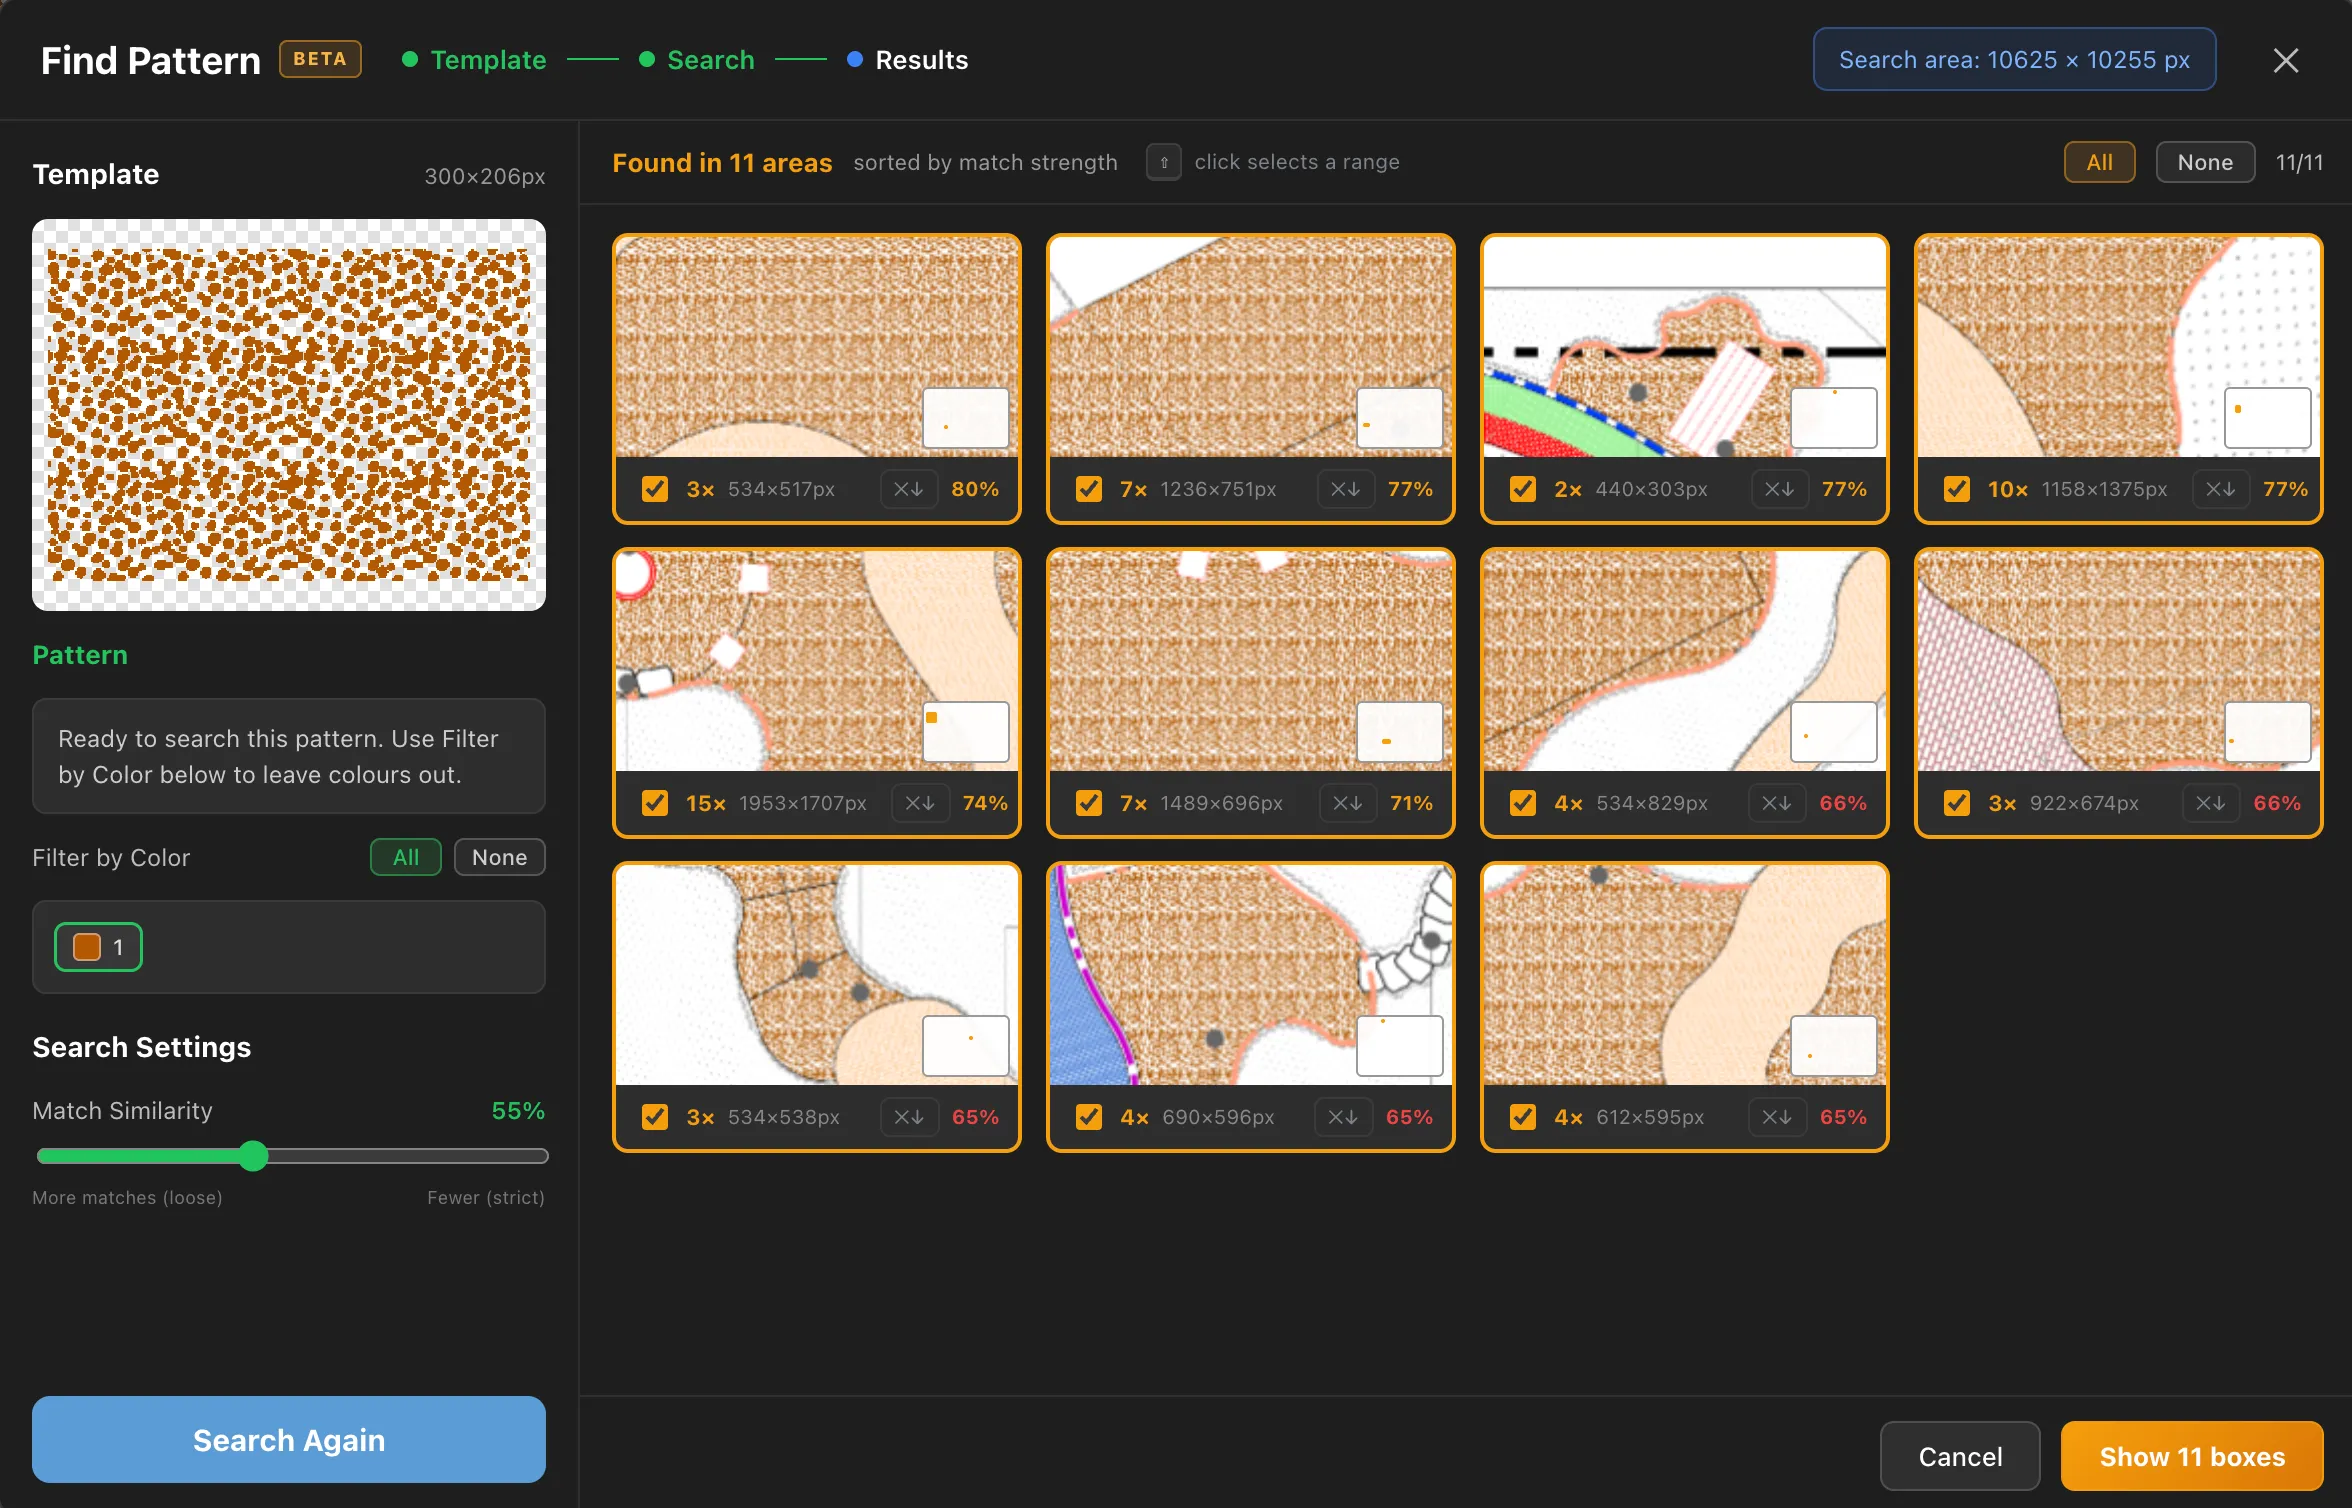
Each card carries a multiplier, 1×, 2×, 3× and so on. That is how many
separate hits were grouped into that one area, because hits sitting close
together are reported as a single place to visit rather than as a scatter of
overlapping ones. It is why the header counts areas rather than matches, and
why cards are different sizes.
Every card starts selected. Work down the list and untick anything that is not really your pattern. Because results are ordered by strength, the wrong matches cluster at the bottom, and there are two quick ways to clear a tail of them:
- Shift-click a card to select or clear the whole range back to your last click.
- The ✕↓ button on a card clears that card and every match below it.
All and None select or clear everything, and the counter shows how many are selected. When the selection is right, click Show N boxes.
If nothing useful came back, the fix is the same as for Auto Count: try Search Again with a lower Match Similarity, or draw a clearer example of the pattern.
Working with the boxes
Section titled “Working with the boxes”The accepted matches are drawn as highlighted boxes on the drawing, and the panel shows how many areas were found.
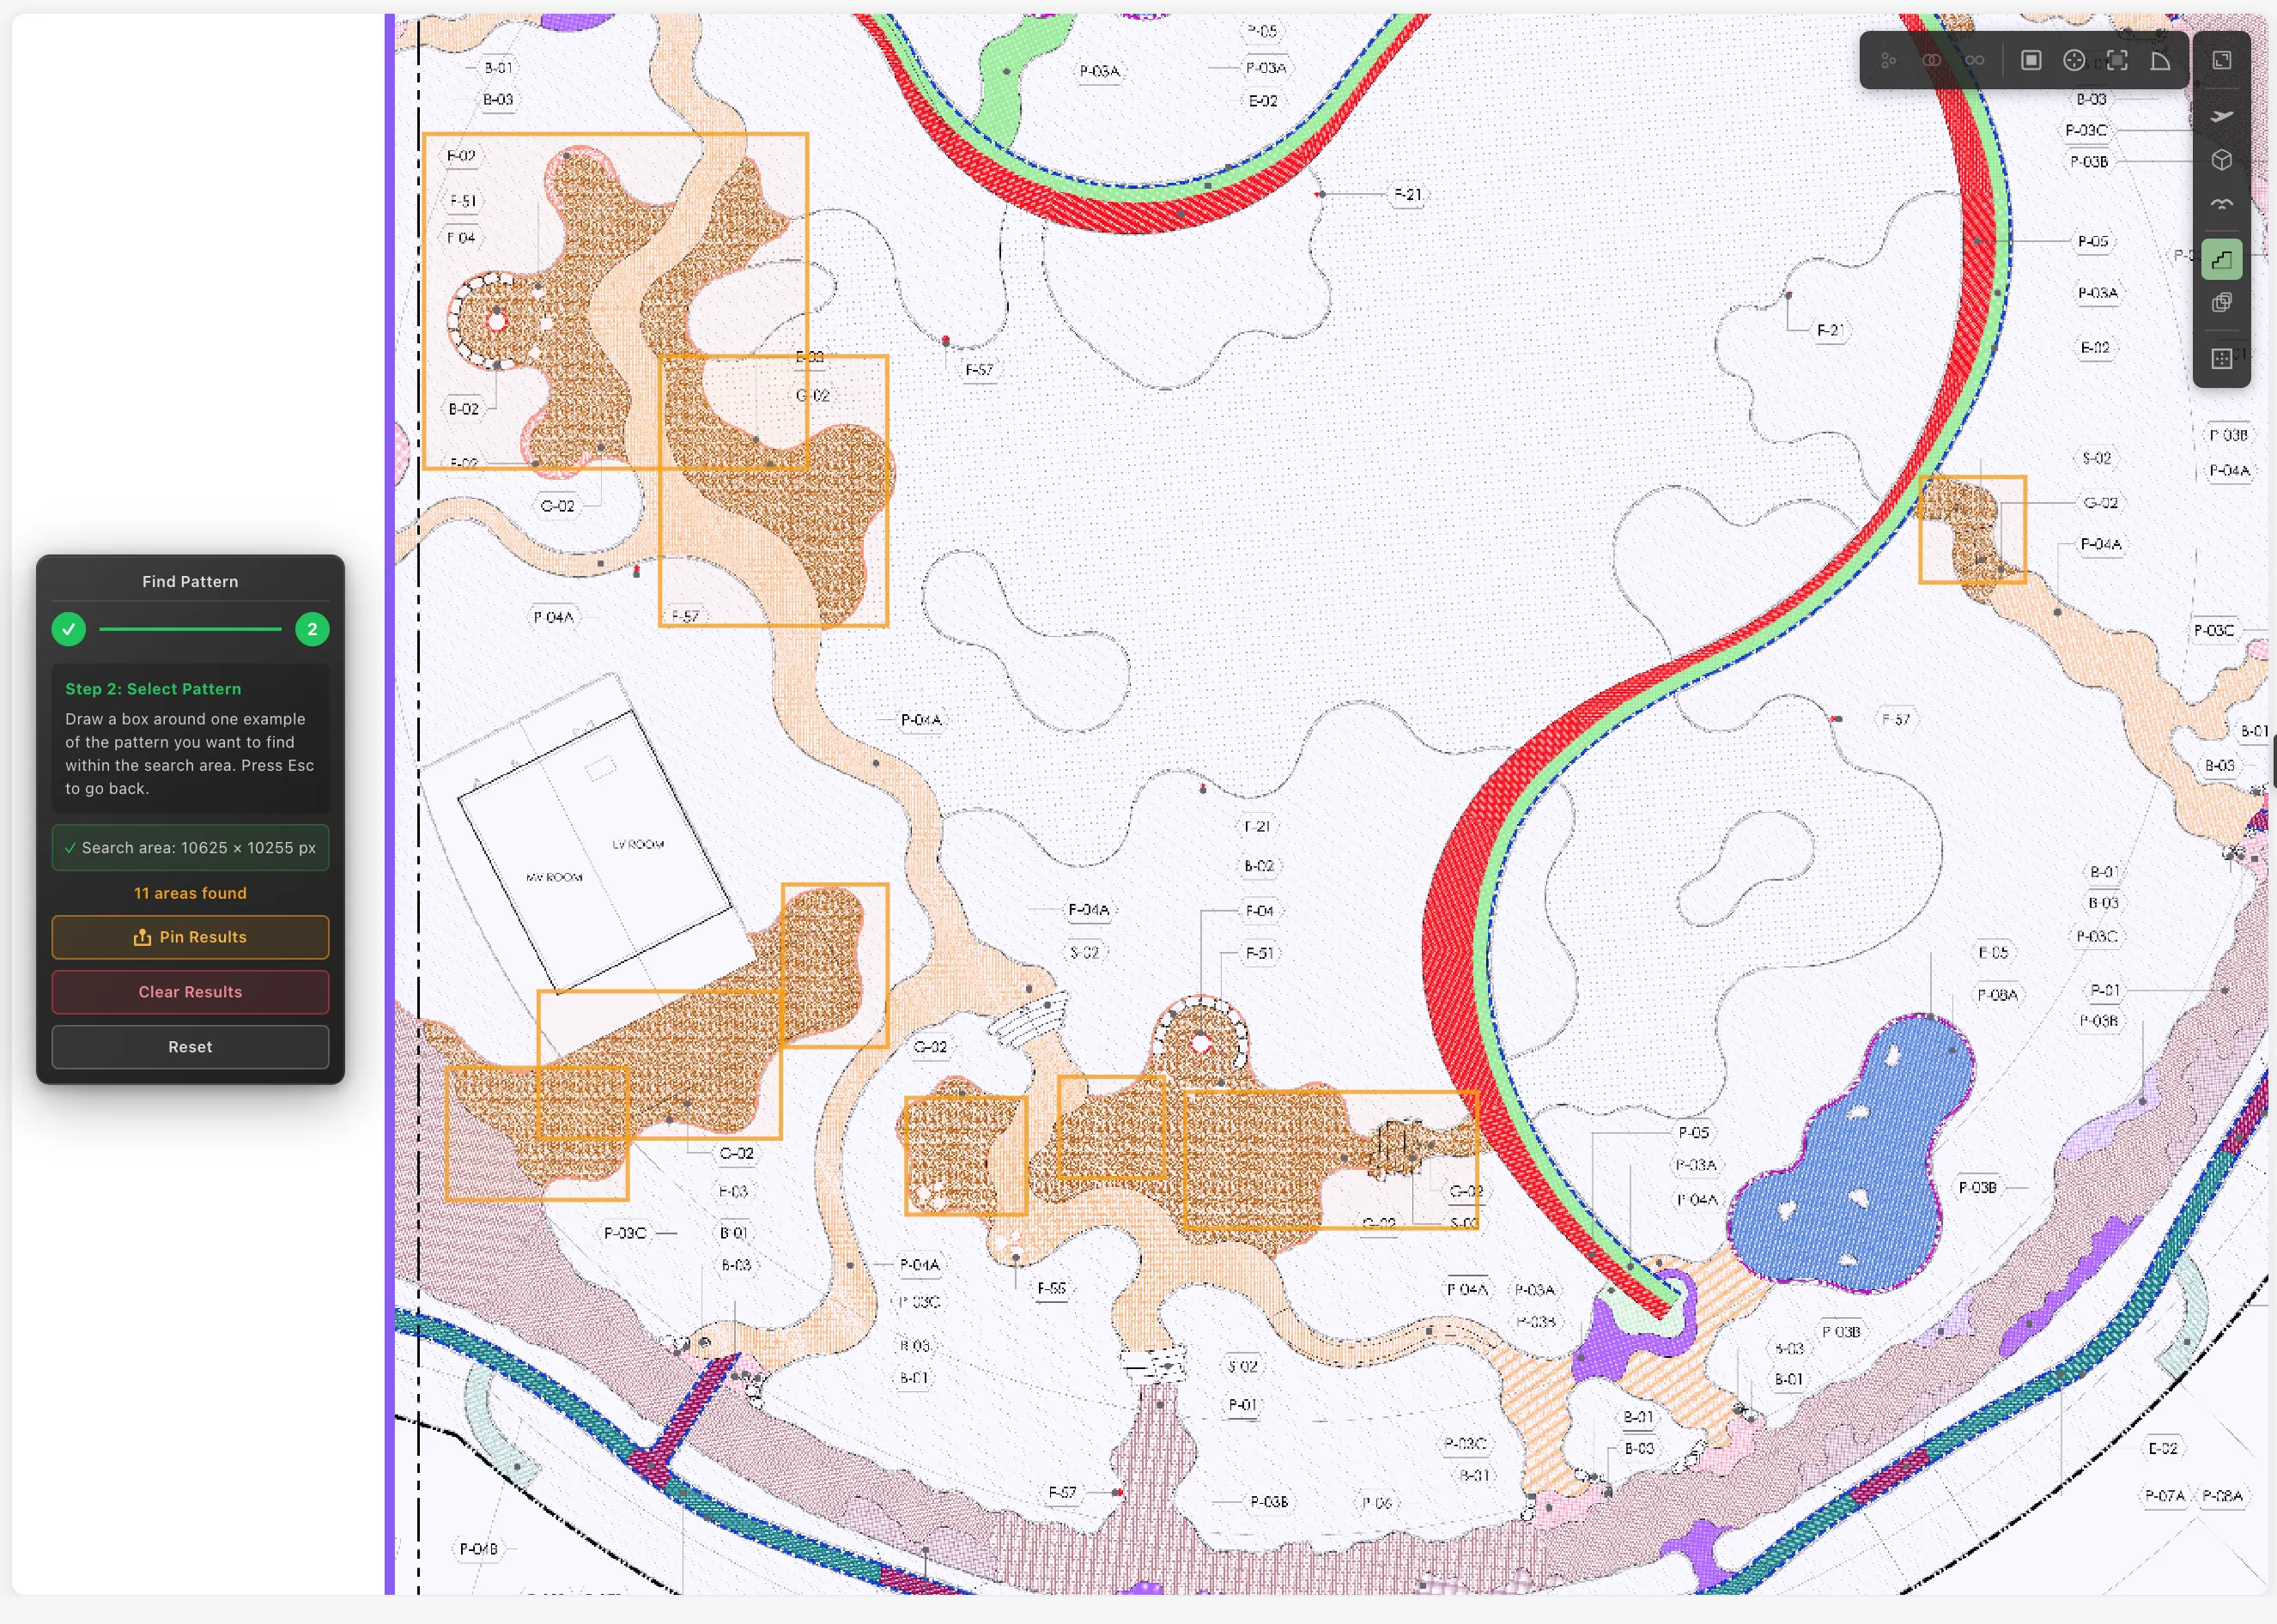
- Pin Results keeps the boxes visible after you switch tools, so you can work through them with a region or count tool while they stay on screen. Click again to unpin.
- Clear Results removes the boxes when you are done.
- Reset starts over with a new search area.
The usual workflow: pin the results, switch to the right takeoff tool, and work through the highlighted areas one by one. The boxes act as a checklist of places to visit, which is exactly what stops the missed instance that costs money later.
Choosing a good example
Section titled “Choosing a good example”The example you draw decides everything that follows, the same as Auto Count’s template.
- Pick an instance that is complete and unobstructed, not one crossed by a leader line or dimension.
- Pick a typical one rather than an unusual variant.
- Include the whole pattern and as little surrounding drawing as possible.
If results are poor, redrawing the example is usually more effective than adjusting the settings.
Common questions
Section titled “Common questions”Does Find Pattern add anything to my quantities? No. It highlights where a pattern appears. Measuring or counting what it finds is done with the normal takeoff tools.
Why did it miss an instance? The missed one may differ from your example more than the current Match Similarity allows, or sit outside the search area you drew. Loosen the slider or redraw the search area larger, then Search Again. The tool is in beta, so a visual check of the drawing is always worth it.
Why are the last few results wrong? Results are sorted by match strength, so the weakest sit at the bottom. That is expected. Clear them with the ✕↓ button on the first wrong card.
Can I search the whole sheet? Draw the search area over the whole sheet. Prefer a tighter area when you can, since it is faster and returns fewer false matches.
The boxes disappeared when I switched tools. Results clear on tool switch unless pinned. Run the search again and click Pin Results before switching.