

The Hueprint workflow
Most of this documentation gives you a tool per situation. This page is different. It describes one way of working that, on the right drawing, takes off most of a sheet with a single tool.
Three things combine:
| What it brings | |
|---|---|
 Hueprint Hueprint | Materials that were hard to tell apart by eye become easy to tell apart and easy to select |
 Inclusive Region Inclusive Region | You choose which colours count as part of the area, then take it off in one click |
 CrossGuard CrossGuard | Keeps that one click inside the boundary you can see |
Separately each is useful. Together they change how a sheet is measured: instead of clicking area after area and correcting as you go, you tell PixelTakeoff what the material looks like and take the whole material off at once.
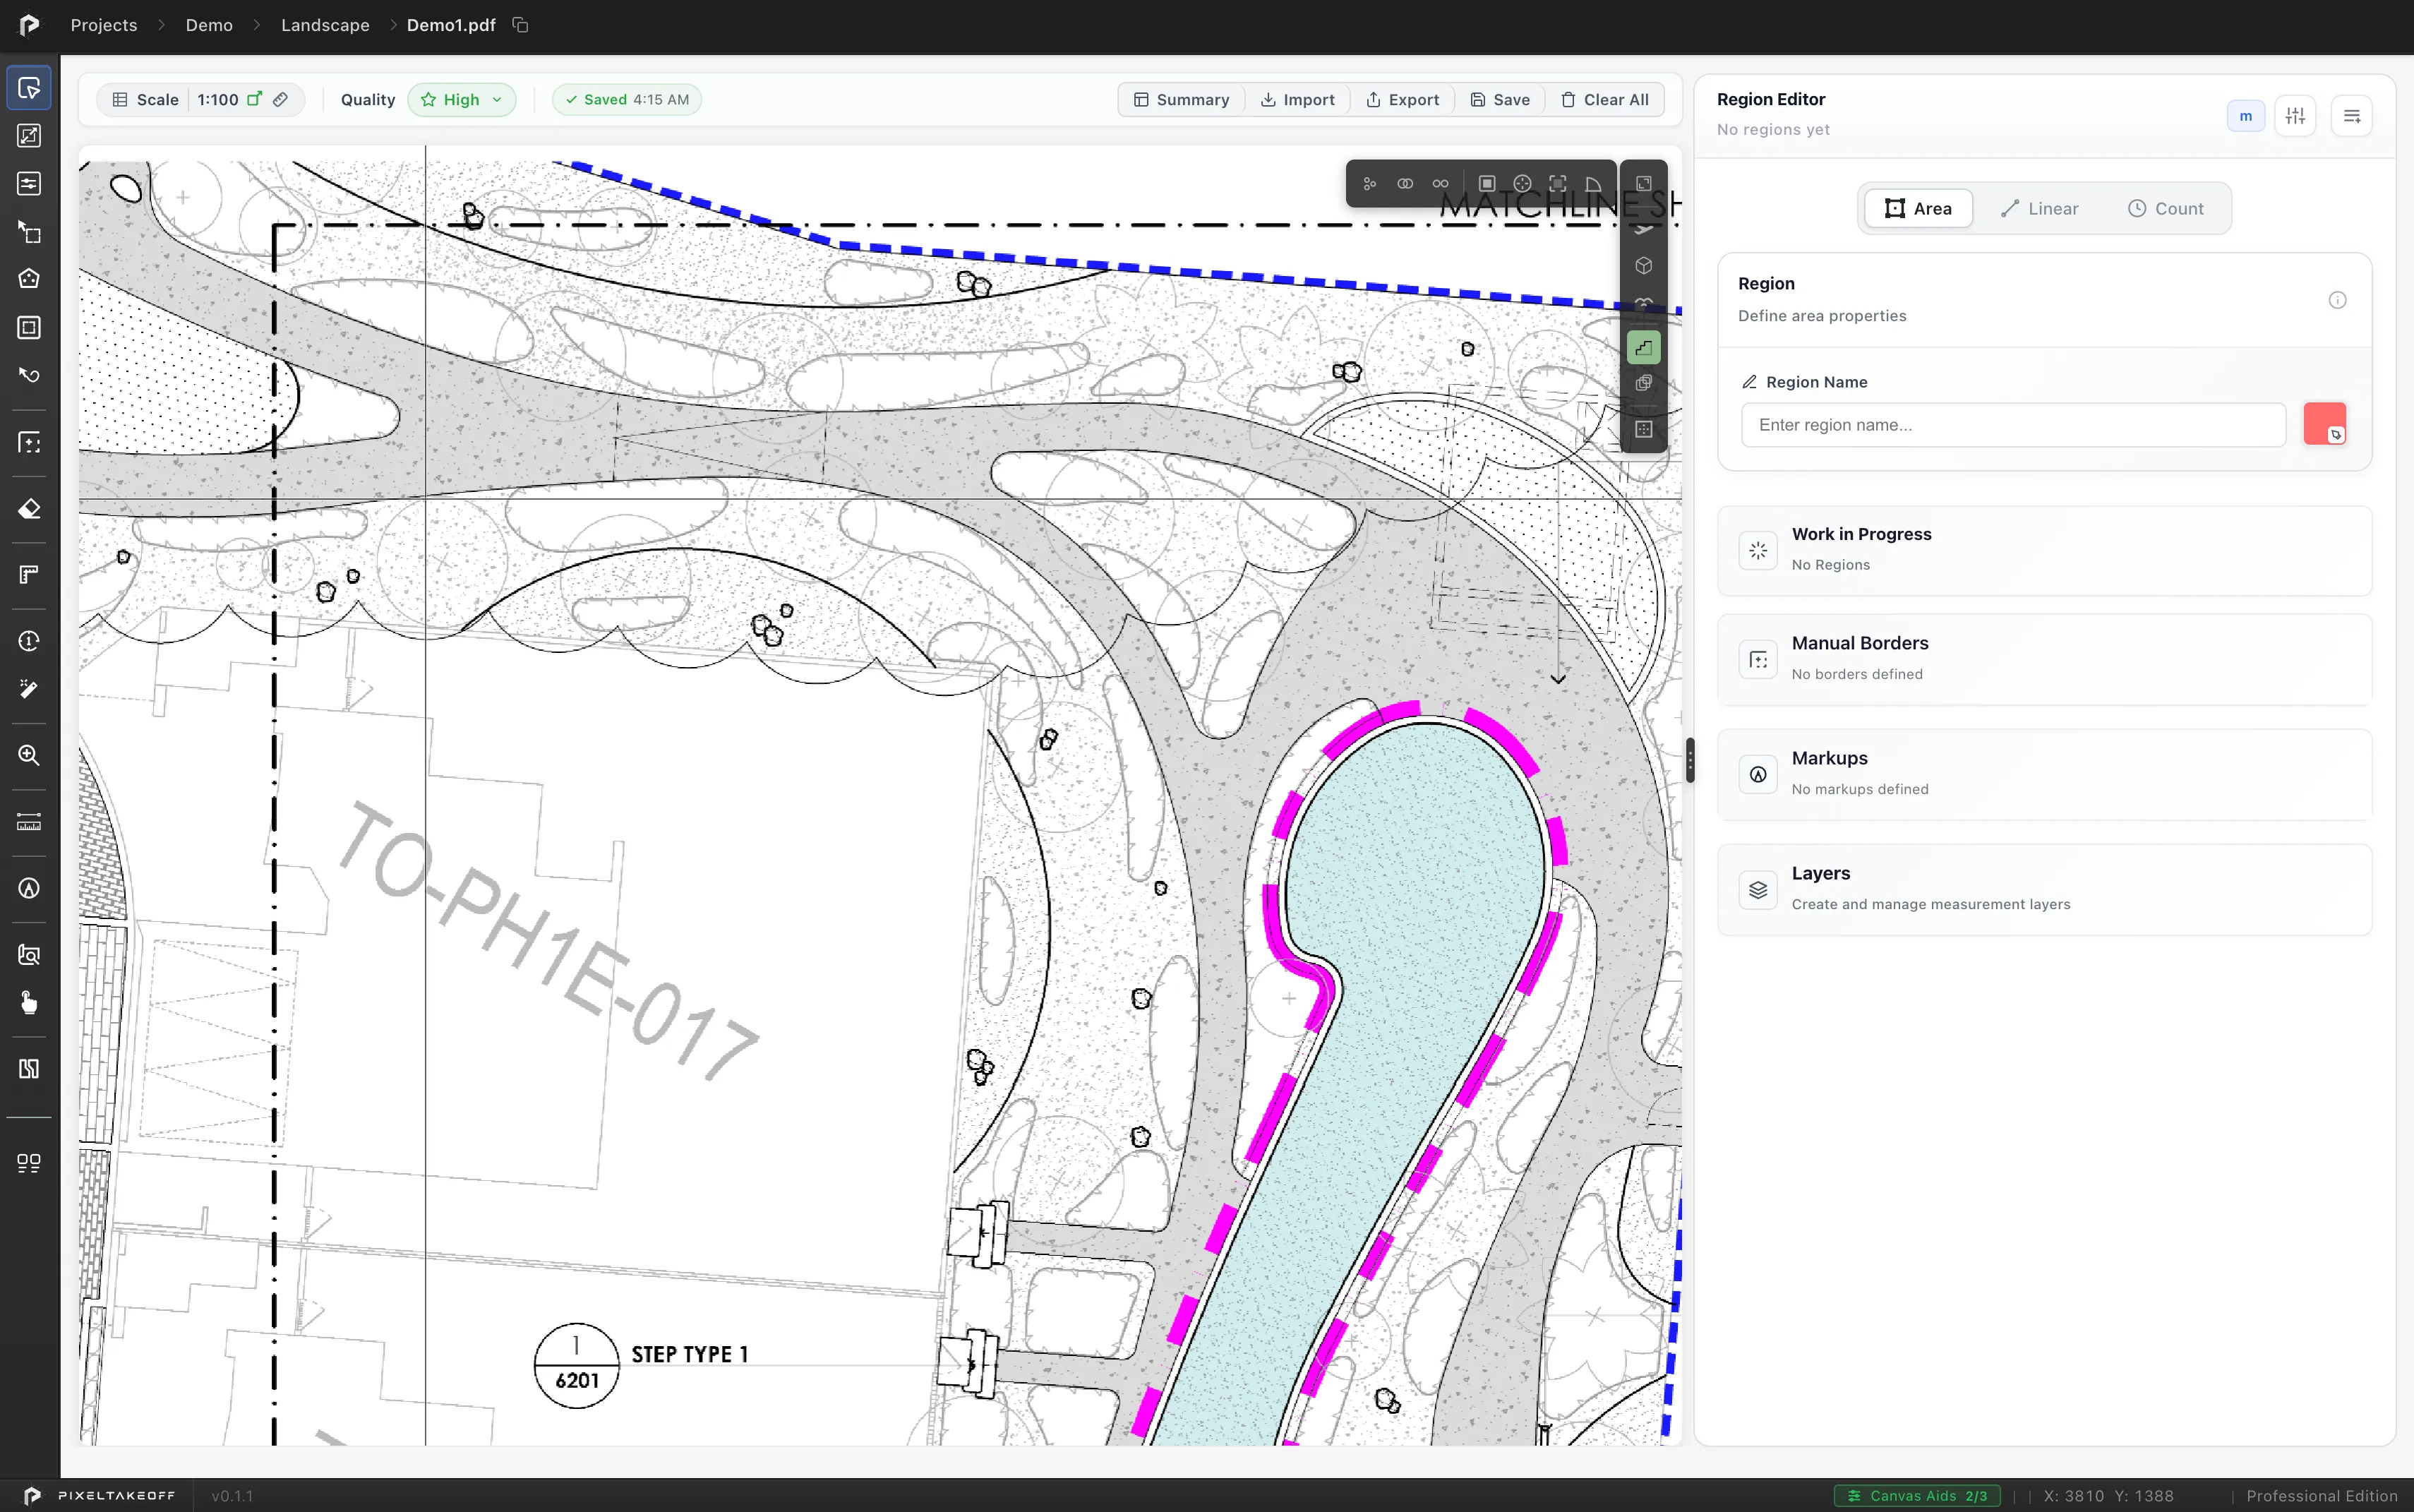
Here is a landscape sheet in Normal view. The paving, the planting beds and the surrounds are all drawn in the same grey, and the hatching runs through all of them:
The same drawing in Hueprint. Nothing has moved and nothing has been measured yet, but every material is now something you can point at:
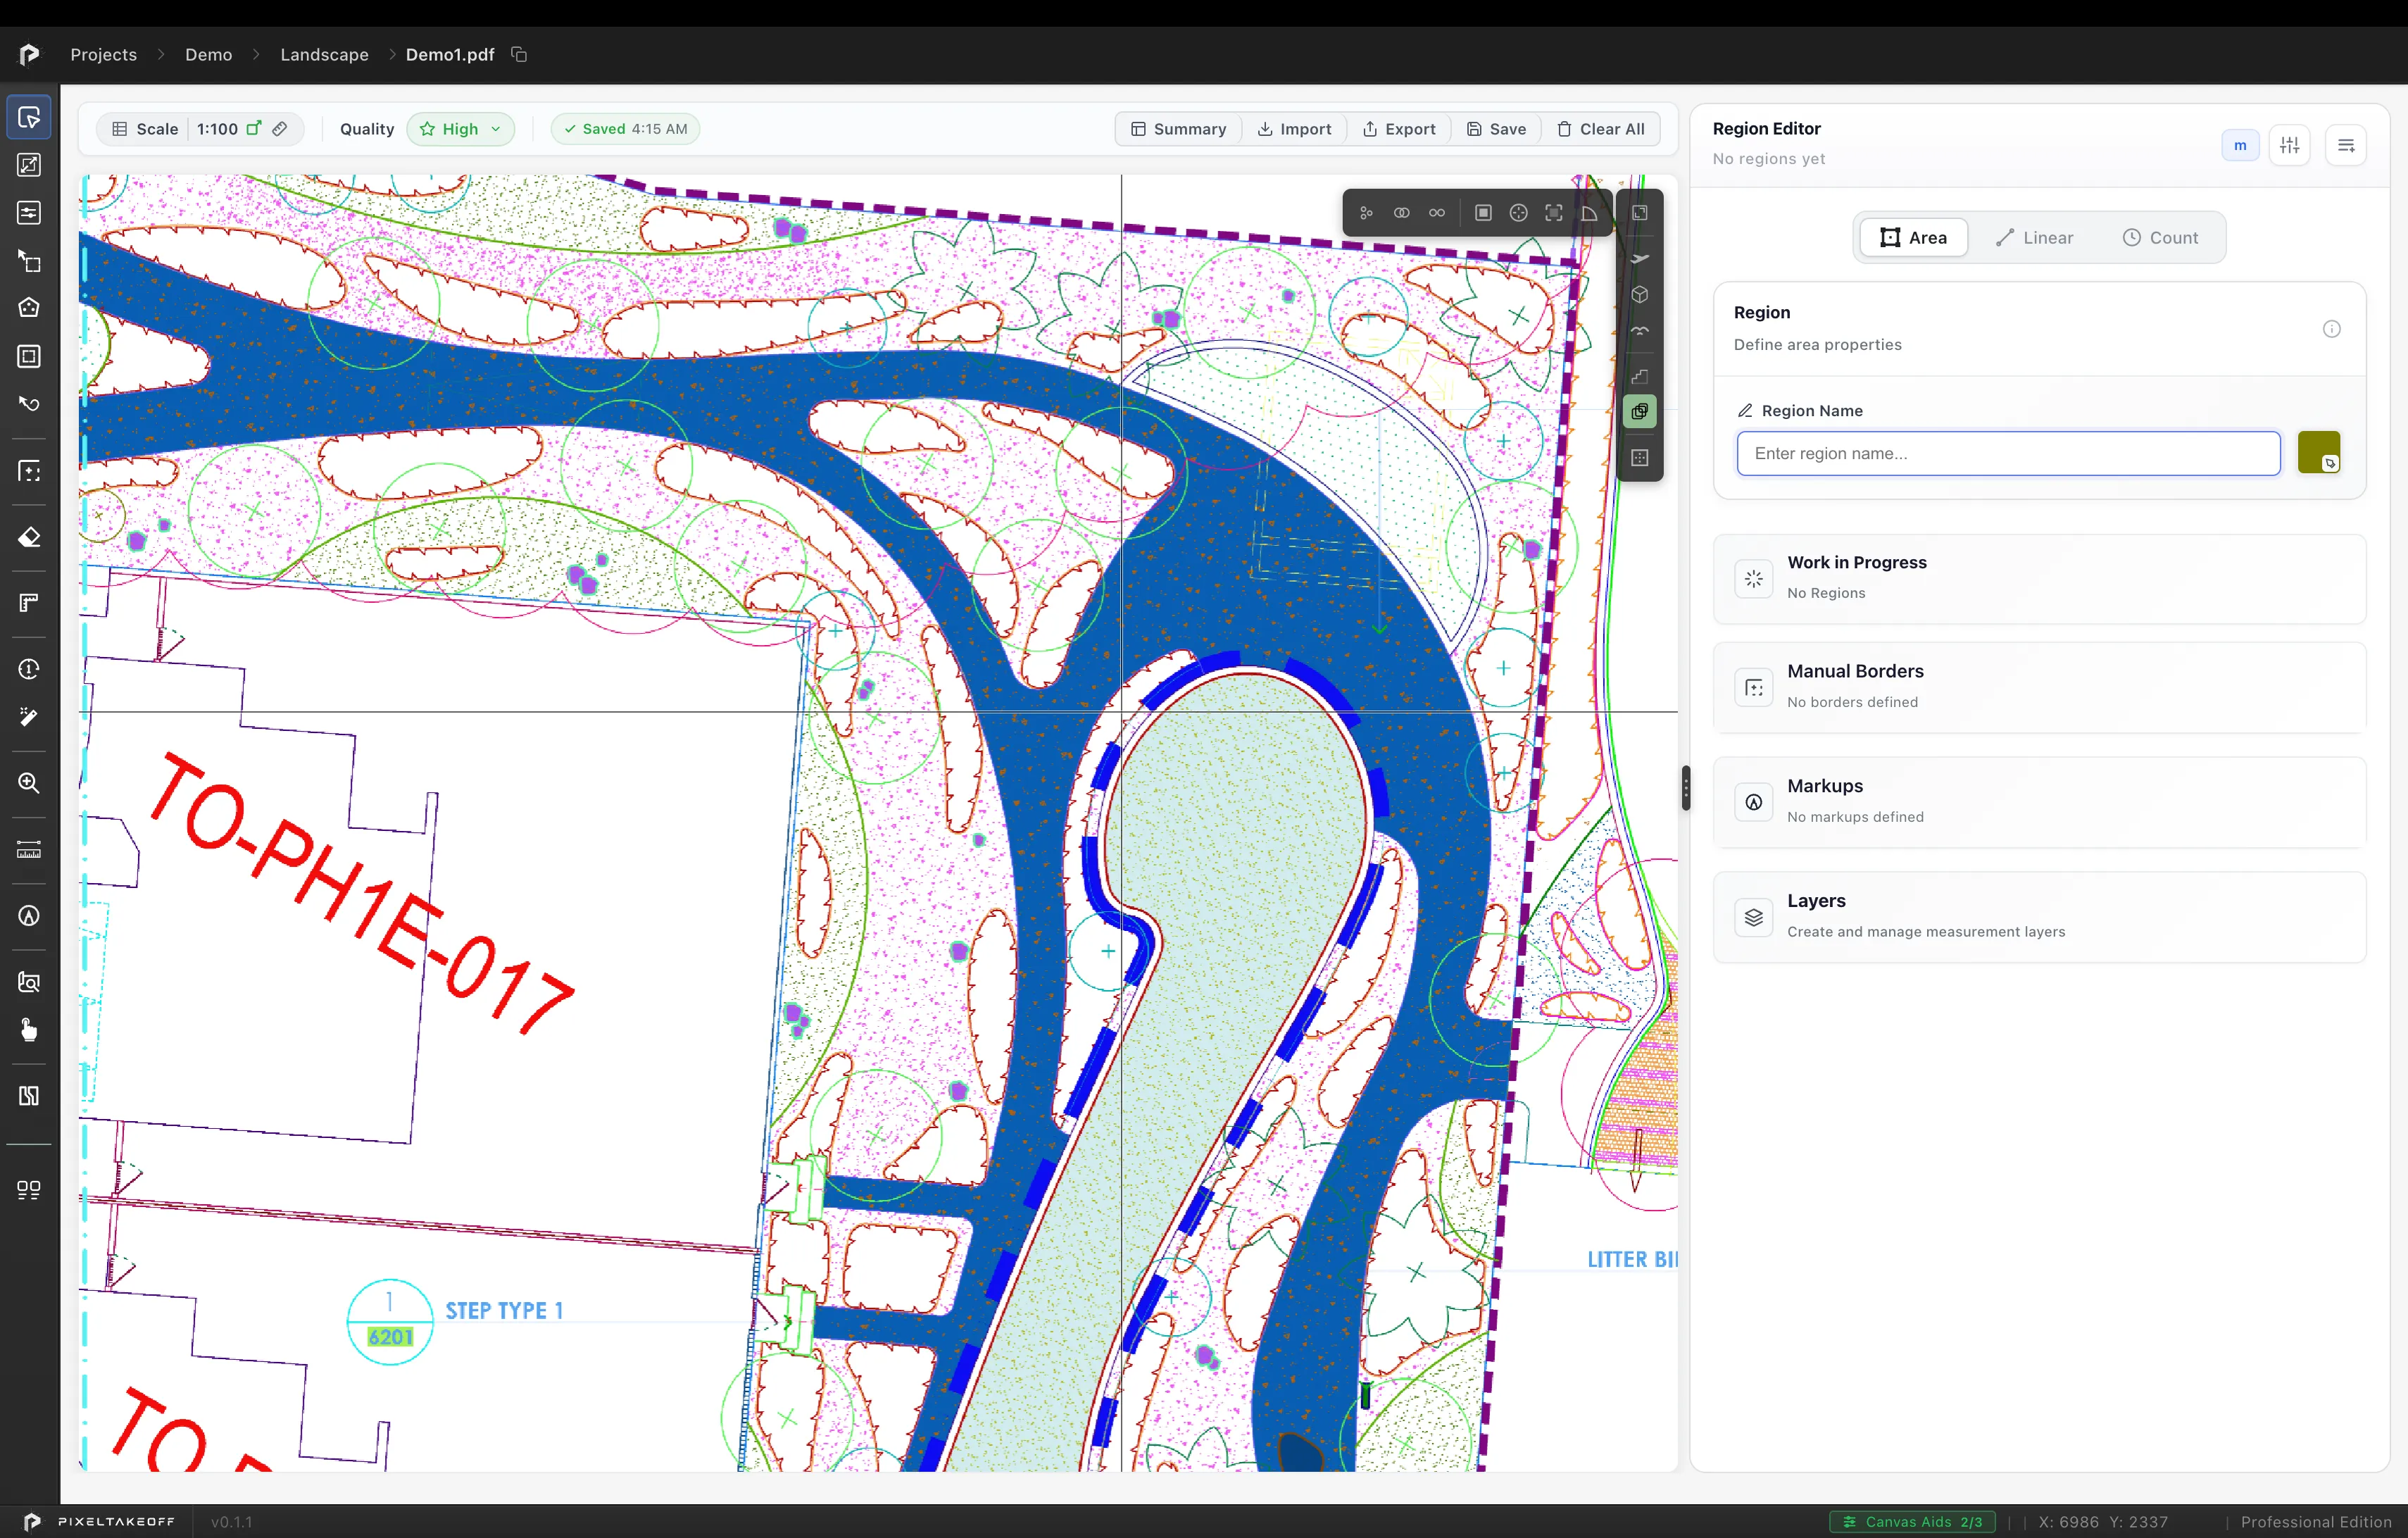
The second sheet is the one worth taking off. Every material on it is now something Inclusive Region can be told to collect.
Hueprint is PixelTakeoff’s own view of a drawing, and is patent pending.
It depends entirely on one thing
Section titled “It depends entirely on one thing”The PDF must carry its layer information.
Design software knows which parts of a drawing are paving, which are planting and which are kerbs, because the drawing was built that way. That knowledge can be saved inside the PDF, and Hueprint needs it. Most PDFs that reach an estimator have had it thrown away at export, and once it is gone it cannot be recovered from the file.
So the single highest value thing you can do before starting a job is to get a PDF that still has it.
Where the option lives
Section titled “Where the option lives”Names vary between products and versions, so the reliable move is to search your software’s help for “PDF layers”. These are the usual places:
| Software | Look for |
|---|---|
| AutoCAD and AutoCAD based products such as Civil 3D | An Include layer information option. It sits with the PDF plotter’s properties when you plot, and the same switch appears in the PDF export options |
| Adobe Illustrator | Create Acrobat Layers from Top-Level Layers, in the Save as PDF options. It needs the compatibility set to Acrobat 6 or later |
| Vectorworks | The PDF export options include a setting for exporting layers and classes as PDF layers |
| ArchiCAD | The PDF save options include a setting for creating PDF layers |
| MicroStation | The print and PDF export settings include a create PDF layers option |
| Revit, SketchUp and LayOut | These may not offer it at all. If not, ask for a PDF produced from the CAD file rather than from the model |
How to check a PDF has it
Section titled “How to check a PDF has it”Do this before you start measuring, not after.
- Open the drawing.
- Press
Ctrl+6, or click Hueprint in the canvas
controls. - If the drawing changes, the layer information is there and this workflow is available.
- If you are told the PDF has no layer information and the drawing returns to Normal view, it is not. Go back and ask for a re-export, or measure the sheet with the ordinary area tools.
A scan, a photograph of a drawing, or a PDF that has been printed and scanned again will never have it, whatever the sender does.
The workflow
Section titled “The workflow”Once a drawing passes that check:
- Set the scale. Nothing can be measured without it, and this workflow measures a lot at once.
- Switch to Hueprint (
Ctrl+6). Give it a moment on a large sheet. - Select Inclusive Region (
I). - Name and colour the group before you click anything, since name and colour are what carry the total.
- Collect the colours of the material. In the Inclusive Colors panel,
leave
 Auto selected and click on the material
on the drawing. Use
Auto selected and click on the material
on the drawing. Use  Manual to add any it missed.
 - Read the list. Everything under Pass-Through Colors counts as part of the area. Take out anything that belongs to a boundary rather than to the material.
- Turn on CrossGuard (
⇧X) and leave Max gap at 8 to start with. - Click inside the material. Everything made of those colours comes off in one action.
- Check the result, particularly the corners, and patch anything left behind.
- Save the group and start the next material.
The panel while you work, with a material’s colours collected and CrossGuard waiting underneath them:
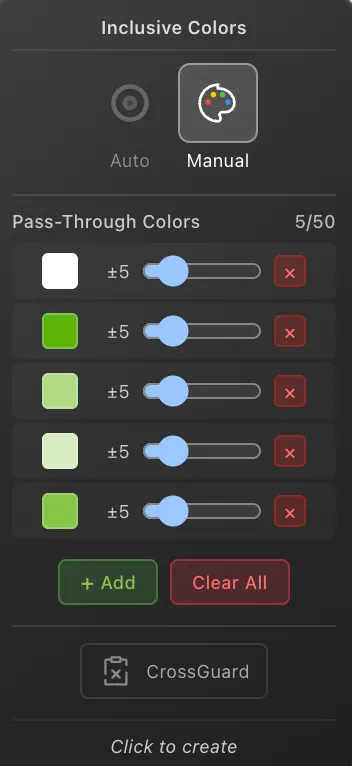
From step 4 onward each material is four clicks and a check, however many separate areas of it there are on the sheet.
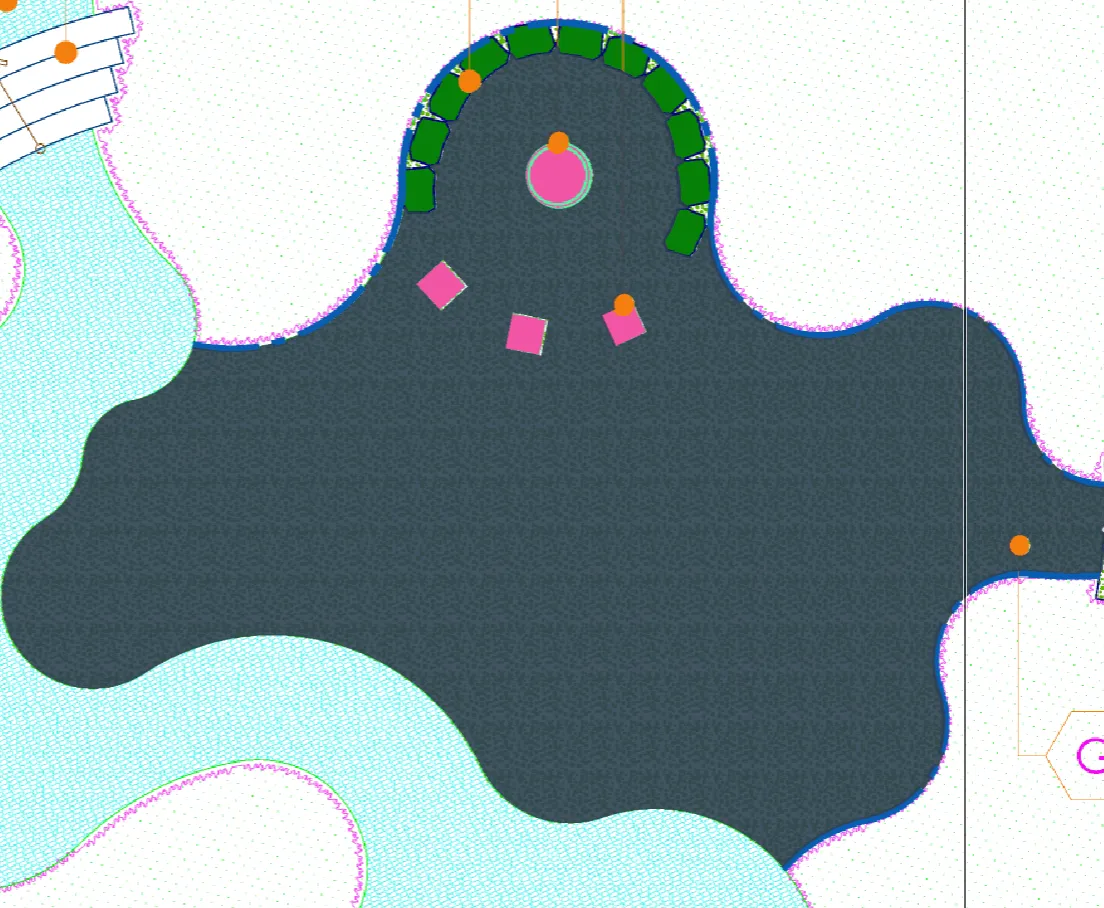
And the result of step 8. One click, and the whole material comes off, holding the curved edge against the planting beds and the water feature on either side:
Why the three need each other
Section titled “Why the three need each other”Hueprint without Inclusive Region is just an easier drawing to look at. You would still be clicking area by area.
Inclusive Region without Hueprint works, but you are choosing colours from the drawing as the designer happened to produce it. Where two materials are drawn in similar tones, the colours you pick for one will collect the other as well.
Either without CrossGuard is the one that costs you time. A single click that is meant to take off every instance of a material is also a single click that can escape through one broken boundary line and take off half the sheet. CrossGuard is what makes a big fill safe to attempt.
Tuning it
Section titled “Tuning it”Max gap is remembered separately for Normal view and for Hueprint, because a drawing behaves differently in each. Setting it in one does not change the other, so expect to set it once per view rather than once per drawing.
Keep it as low as it can go. A high setting is more likely to leave tight corners and narrow ends unfilled, which is quiet area missing from your quantity.
Colours are per material, not per sheet. Clear the list and collect again for the next material rather than adding to what is already there, or the second takeoff will include the first.
When to use something else
Section titled “When to use something else”This workflow is not the answer to everything.
- No layer information, and no way to get a re-export. Use the ordinary area tools.
- The sheet is a scan. Same answer, and
 Crisp
will help you see it.
Crisp
will help you see it. - One or two areas of a material. Setting up colours is worth it for a
material that appears many times, not for a single courtyard. Use
 Region.
 - Hatched areas in Normal view.
 Expand Region is
the tool built for those.
Expand Region is
the tool built for those.
Common questions
Section titled “Common questions”Does Hueprint change my drawing or my quantities? No. It changes how the sheet is presented to you while you work. What you measure and what you export are unaffected, and you can switch back at any time.
Can I take off in Hueprint and review in Normal view? Yes. Your takeoff belongs to the drawing, not to the view, so switch between them freely.
The fill collected two materials at once. They share a colour on your list. Remove the colour they have in common, or take the smaller material off first and let the region rules keep the second fill out of ground already measured.
The fill escaped across the sheet. A boundary colour is on the list, so the
fill treats the boundary as part of the area. Take it off the list. If it
escapes with the list correct, the boundary itself is broken, so raise
Max gap a little or close the gap with
 Manual Border.
Nothing happened when I clicked. You clicked on something whose colour is not on the list. Add it, or click somewhere more typical of the material.